Adding secrets with AWS
Here you can find all the information a customer may need to setup the necessary AWS resources and what information is required to enable the Fluid Attacks CSPM module or to add a new credential to clone your repository.
AWS enrollment
You will need to setup an IAM role that our scanner can assume to access your AWS resources. After successfully creating the role, all that is required is the role ARN to get started with CSPM.
Before you create this role, you will also need an external ID that Fluid Attacks generates for your organization. Check here how to get this data.
Note: Keep in mind that if your organization has more than one AWS account, you can create the role on as many of them as you need and provide the correct ARN when prompted while adding a credential or an environment.
There are several ways to set the role up:
- Manually create it using the AWS management console.
- Using AWS CloudFormation templates and the AWS CLI.
Manual configuration from AWS management console
Now we will show you how to create the required role from the AWS user interface.
We need to start a session in the AWS Management Console with a user account authorized to create new roles and attach policies to it.
Once logged into the AWS Management Console, use the search bar to look for the IAM service and select it.

Inside the IAM Dashboard,
select the Roles option in the left sidebar menu.
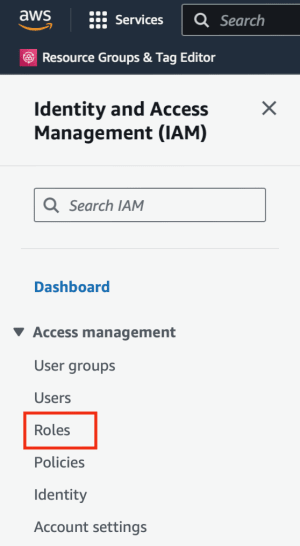
And click the button Create Role

When setting up the role configuration,
in the Trusted entity Type section,
select Custom trust policy.

And in the code editor below Custom trust policy,
paste the following policy.
Trust Policy Explanation
{
  "Version": "2012-10-17",
  "Statement": [
    {
      "Sid": "FluidAttacksAccess",
      "Effect": "Allow",
      "Principal": {
        "AWS": "*"
      },
      "Action": "sts:AssumeRole",
      "Condition": {
        "ArnEquals": {
          "aws:PrincipalArn": "arn:aws:iam::205810638802:role/prod_integrates"
        },
        "StringEquals": {
          "sts:ExternalId": "<YOUR-EXTERNAL-ID>"
        }
      }
    }
  ]
}
Let us review the previous policy. There are 4 key takeaways from it:
- The
Principalfield is set as*, meaning any AWS account can assume this role. Do not worry though, we limit the entities that can assume this role later in the policy. - The
sts:AssumeRoleaction allows other entities to assume this role. - The
aws:PrincipalArncondition ensures that although the principal is open to anyone, the role can only be assumed by Fluid Attacks' production role. - Finally, the
sts:ExternalIdis a shared secret between Fluid Attacks and you and is used to verify that the request to assume the role comes from Fluid Attacks.
After clicking Next,
you will have to choose the permissions
the role will have
over AWS resources.
Select the permission ReadOnlyAccess (recommended).
Or,
if you prefer,
to maintain the principle of least privilege,
you can add to your policy
the read-only access permissions
for each resource you wish to include.
Here is the list of resources
that we check in our CSPM module.
If your goal is to clone a CodeCommit repository,
don't forget to add the corresponding permission.
Here is an example of a user-managed policy used to clone CodeCommit repositories following the principle of least privilege:
{
  "Version": "2012-10-17",
  "Statement": [
    {
      "Sid": "LeastPrivilegeCodeCommit",
      "Effect": "Allow",
      "Action": ["codecommit:Get*", "codecommit:GitPull"],
      "Resource": ["<REPO'S ARN>"]
    }
  ]
}
You will need to create similar statements for each resource you desire. We recommend using the read-only AWS managed policy that exists for each resource.
Recommended permission settings to prevent inconsistencies over time:

If you prefer to create your own policy for restricting permissions granted to the role, below you'll find the list of actions used by the AWS CSPM module to run the checks over your infrastructure.
apigateway:GET(GetMethod)
apigateway:GET(GetResources)
apigateway:GET(GetRestApis)
autoscaling:DescribeAutoScalingInstances
cloudfront:GetDistribution
cloudfront:GetDistributionConfig
cloudfront:ListDistributions
cloudtrail:DescribeTrails
cloudtrail:GetTrailStatus
cloudtrail:ListTrails
cognito-idp:GetUserPoolMfaConfig
dynamodb:DescribeContinuousBackups
dynamodb:DescribeTable
dynamodb:ListTables
ec2:DescribeFlowLogs
ec2:DescribeImages
ec2:DescribeInstanceAttribute
ec2:DescribeInstances
ec2:DescribeKeyPairs
ec2:DescribeLaunchTemplateVersions
ec2:DescribeNetworkAcls
ec2:DescribeNetworkInterfaces
ec2:DescribeRegions
ec2:DescribeSecurityGroups
ec2:DescribeSnapshots
ec2:DescribeVolumes
ec2:DescribeVpcEndpoints
ec2:DescribeVpcs
eks:DescribeCluster
eks:ListClusters
elasticache:DescribeCacheClusters
elasticloadbalancing:DescribeListeners
elasticloadbalancing:DescribeLoadBalancerAttributes
elasticloadbalancing:DescribeLoadBalancers
elasticloadbalancing:DescribeSSLPolicies
elasticloadbalancing:DescribeTags
iam:GenerateCredentialReport
iam:GetAccountPasswordPolicy
iam:GetAccountSummary
iam:GetCredentialReport
iam:GetInstanceProfile
iam:GetLoginProfile
iam:GetPolicy
iam:GetPolicyVersion
iam:GetRolePolicy
iam:GetUser
iam:ListAccessKeys
iam:ListAttachedRolePolicies
iam:ListAttachedUserPolicies
iam:ListGroupPolicies
iam:ListGroups
iam:ListMFADevices
iam:ListRolePolicies
iam:ListRoles
iam:ListSSHPublicKeys
iam:ListUserPolicies
iam:ListUsers
kms:DescribeKey
kms:GetKeyPolicy
kms:GetKeyRotationStatus
kms:ListAliases
kms:ListKeyPolicies
kms:ListKeys
rds:DescribeDBClusters
rds:DescribeDBInstances
rds:DescribeDBSnapshotAttributes
rds:DescribeDBSnapshots
redshift:DescribeClusterParameters
redshift:DescribeLoggingStatus
s3:GetBucketAcl
s3:GetBucketLogging
s3:GetBucketPolicy
s3:GetBucketVersioning
s3:GetBucketPublicAccessBlock
s3:ListAllMyBuckets
secretsmanager:DescribeSecret
secretsmanager:ListSecrets
sns:GetTopicAttributes
sns:ListTopics
sqs:GetQueueAttributes
sqs:ListQueues
sts:GetCallerIdentity
Following the next step, you will see a summary of the role configuration, where you will be able to name the role and add a brief description.

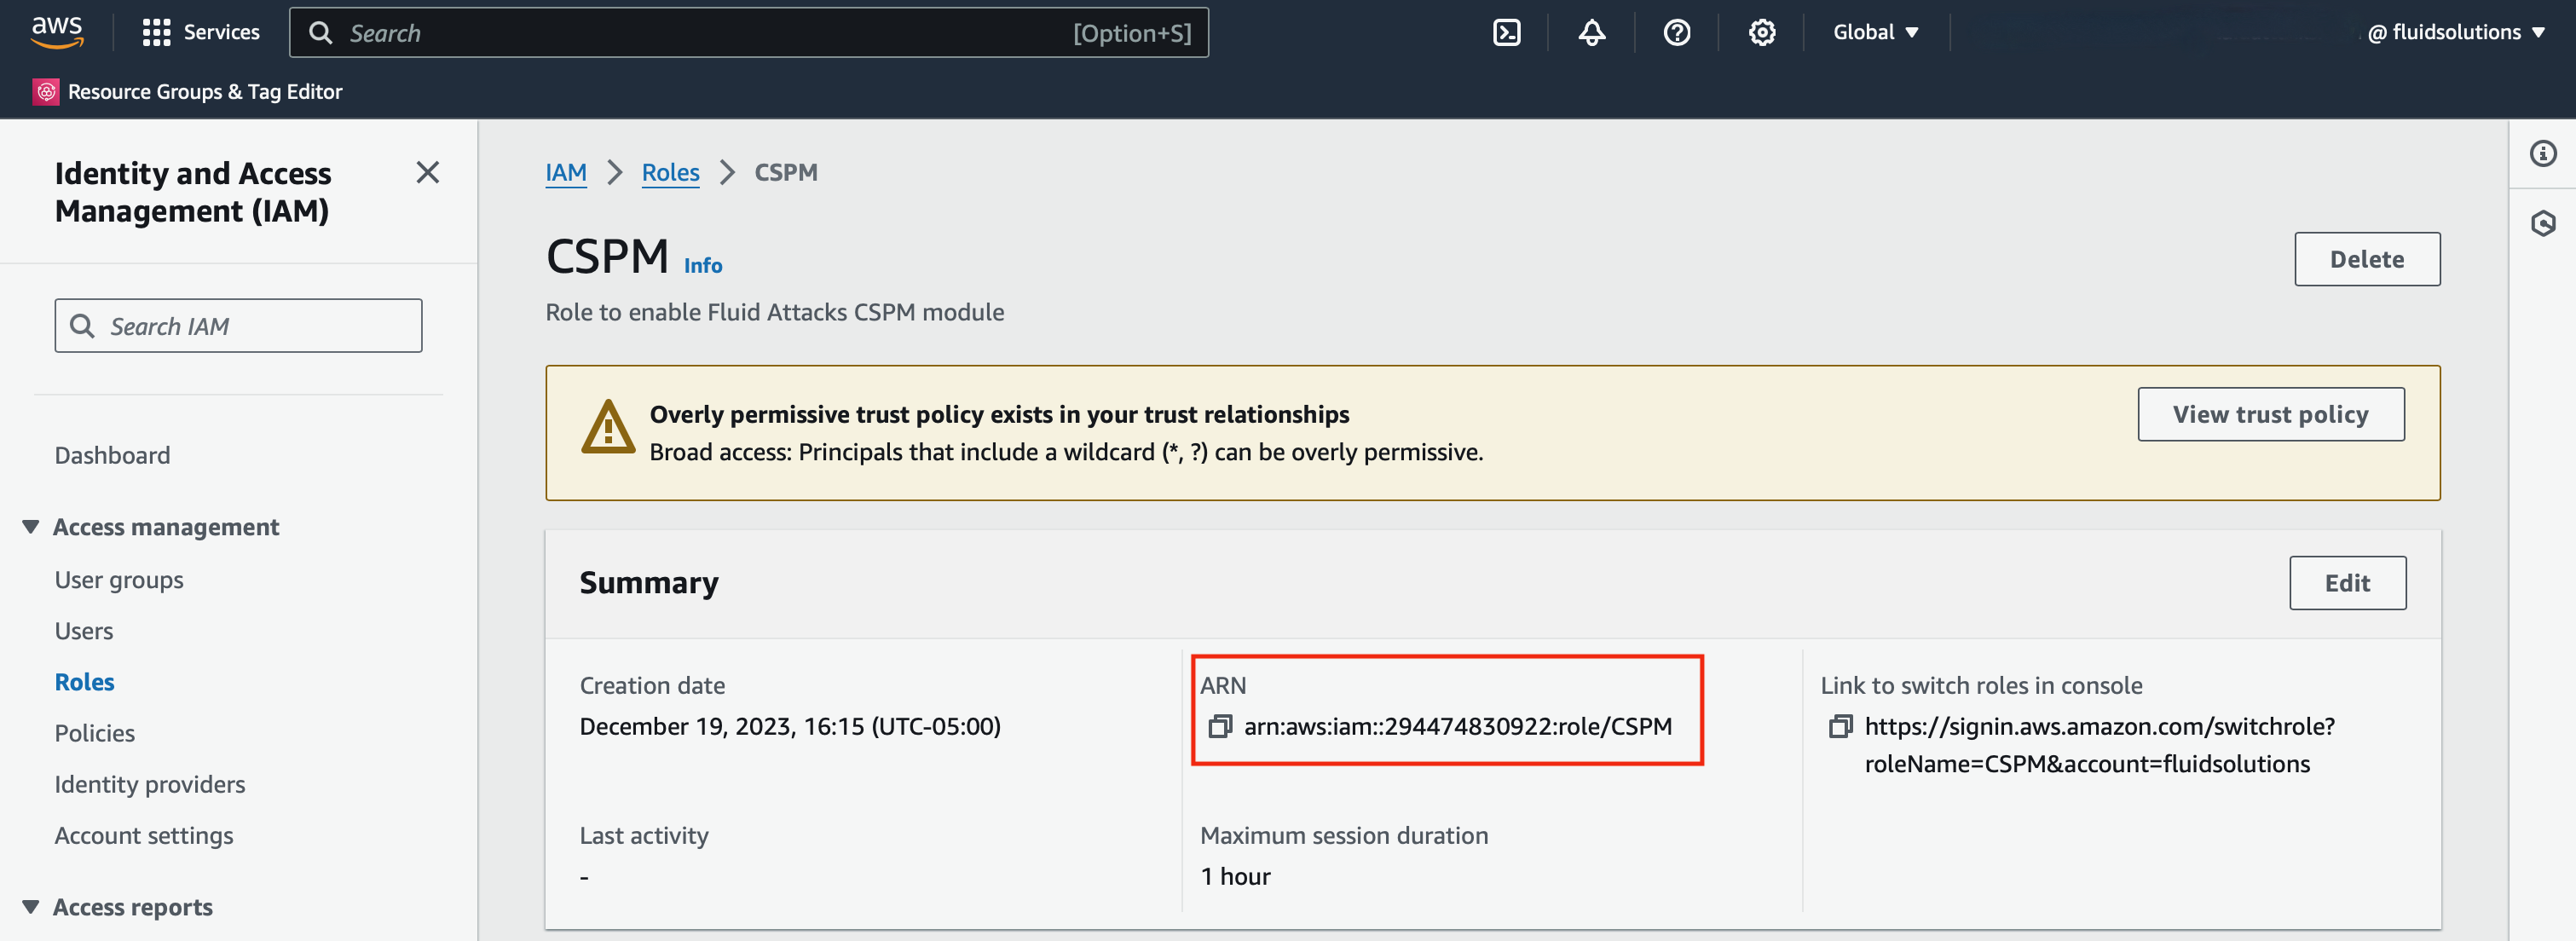
Once you finish the setup, you will be able to see the new role in the list of IAM roles of your account.

Click on the role to see its details. Here, you will see the ARN of the role, which is the information you will fill in Fluid Attacks' platform.
Use AWS CloudFormation templates
In this section, we will show you how to deploy the required resources to enable the Fluid Attacks CSPM module, using CloudFormation.
First, create a new file with YAML extension, copy the following snippet and save it.
Resources:
  CSPMRole:
    Type: AWS::IAM::Role
    Properties:
      AssumeRolePolicyDocument:
        Version: "2012-10-17"
        Statement:
          - Effect: Allow
            Action:
              - "sts:AssumeRole"
            Principal:
              AWS:
                - "*"
            Condition:
              ArnEquals:
                aws:PrincipalArn: "arn:aws:iam::205810638802:role/prod_integrates"
              StringEquals:
                sts:ExternalId: "<YOUR-EXTERNAL-ID>"
      Description: Role to enable Fluid Attacks CSPM module
      ManagedPolicyArns:
        - arn:aws:iam::aws:policy/ReadOnlyAccess
      RoleName: CSPM
Remember to change the <YOUR-EXTERNAL-ID> placeholder
with the external ID
Fluid Attacks generated for you.
If you have any doubts
about the configuration of this template,
see the detailed description here
To deploy this template, you have a couple of options:
Use the AWS CLI
To be able to deploy the template using the CLI, you first need to install the AWS CLI and then configure the security credentials (AWS_ACCESS_KEY_ID, AWS_SECRET_ACCESS_KEY) to authenticate as a user with permissions to read and write CloudFormation and IAM resources.
Once that setup is done, execute the following commands:
aws cloudformation deploy --template-file <path/to/template> --stack-name <stack-name> --capabilities CAPABILITY_NAMED_IAM
Once all the resources are deployed you need to retrieve the ARN of the role. You can use the following command:
aws iam get-role --role-name "CSPM"
You will receive a JSON response with details about the role, including the ARN.
Use the AWS management console
To deploy the template using the AWS Management Console, we need to start a session with a user account authorized to perform read and write operations for CloudFormation and IAM resources.
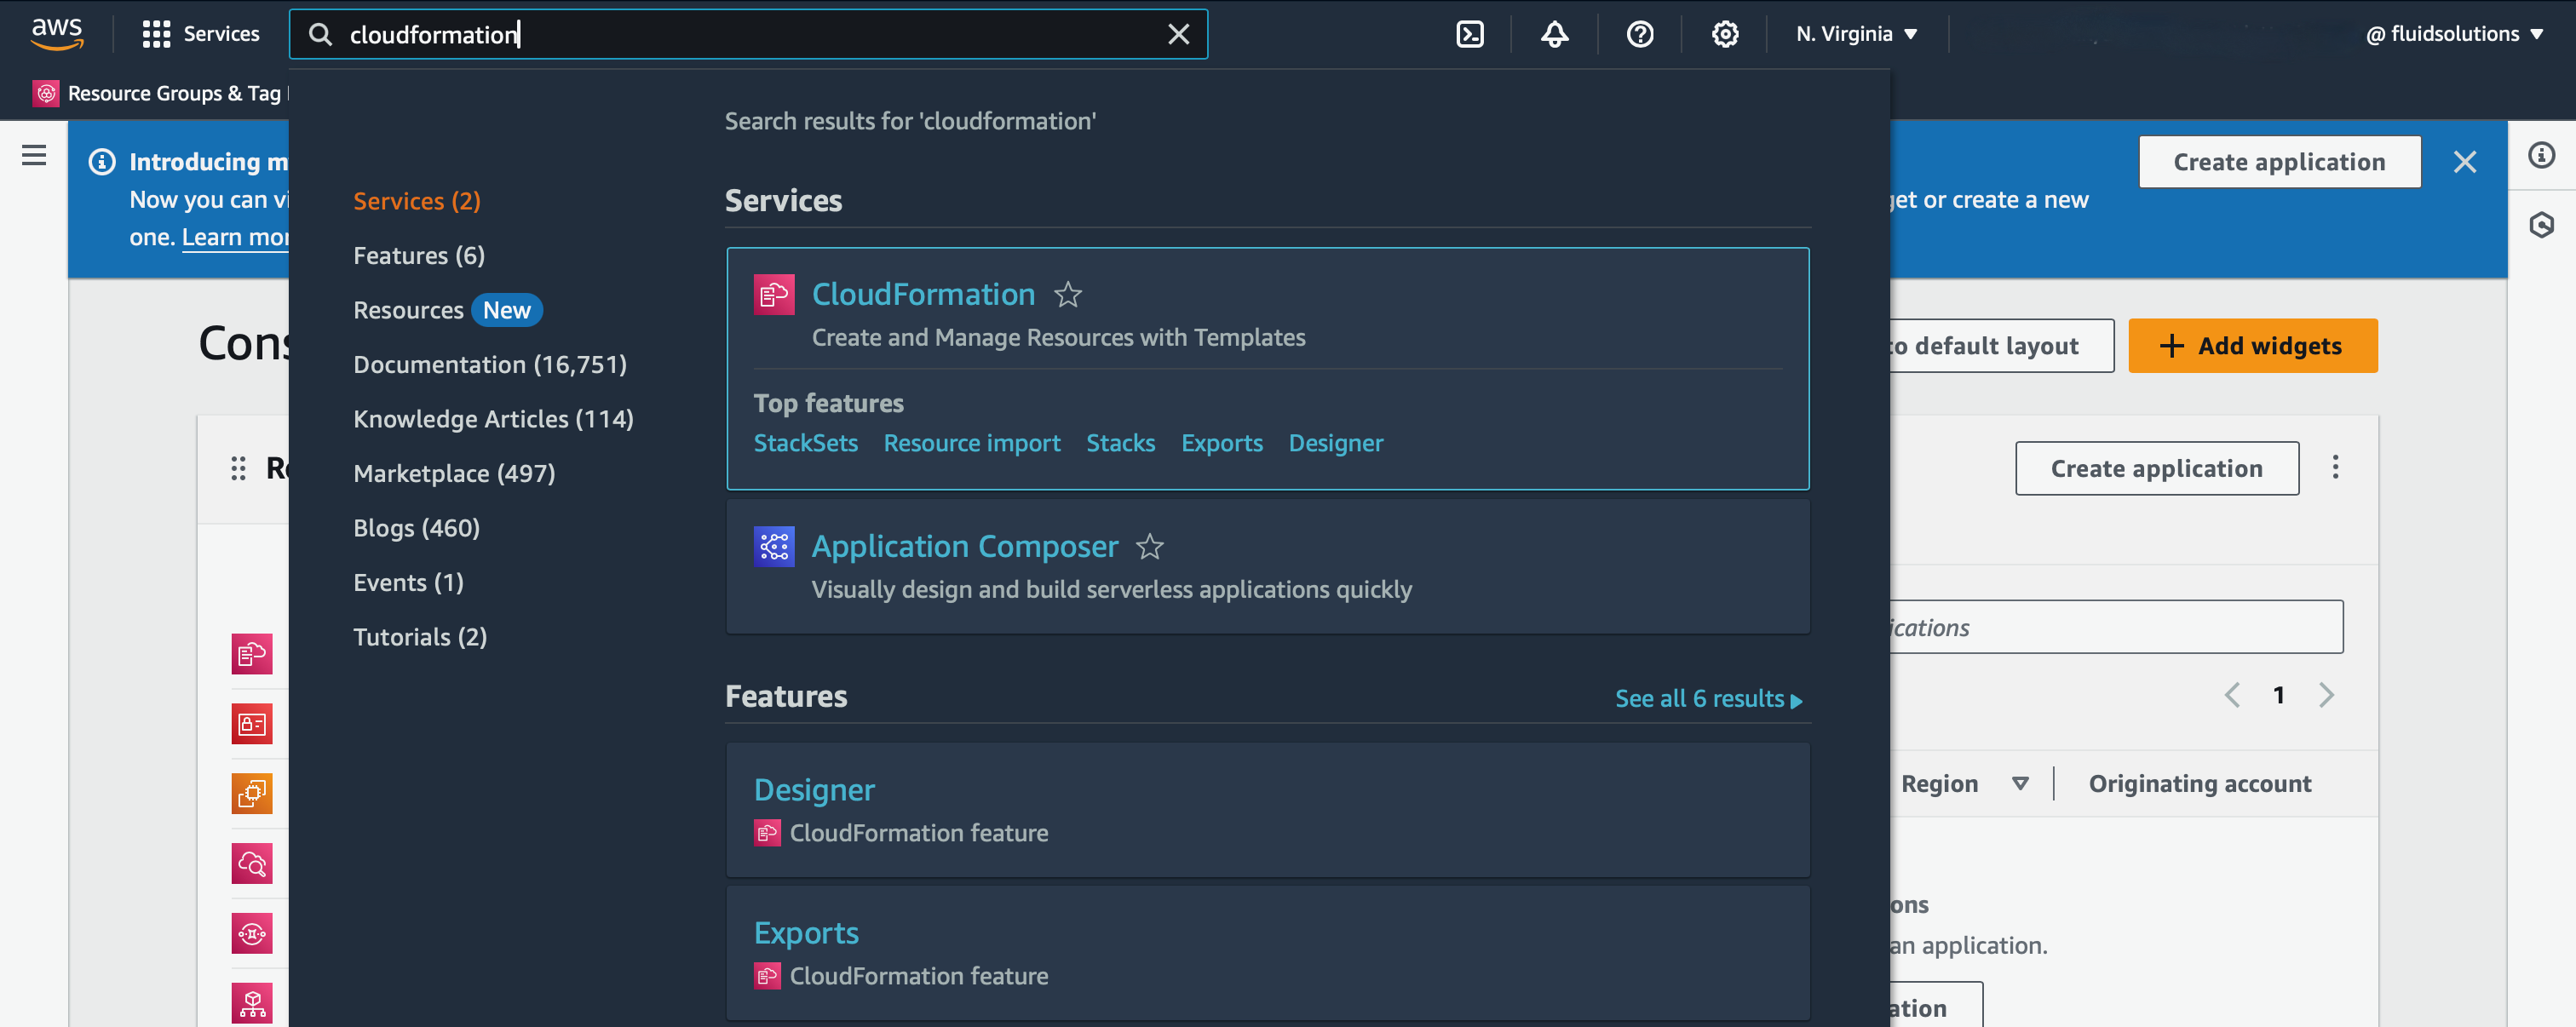
Once logged in, use the searchbar to search for the CloudFormation service.
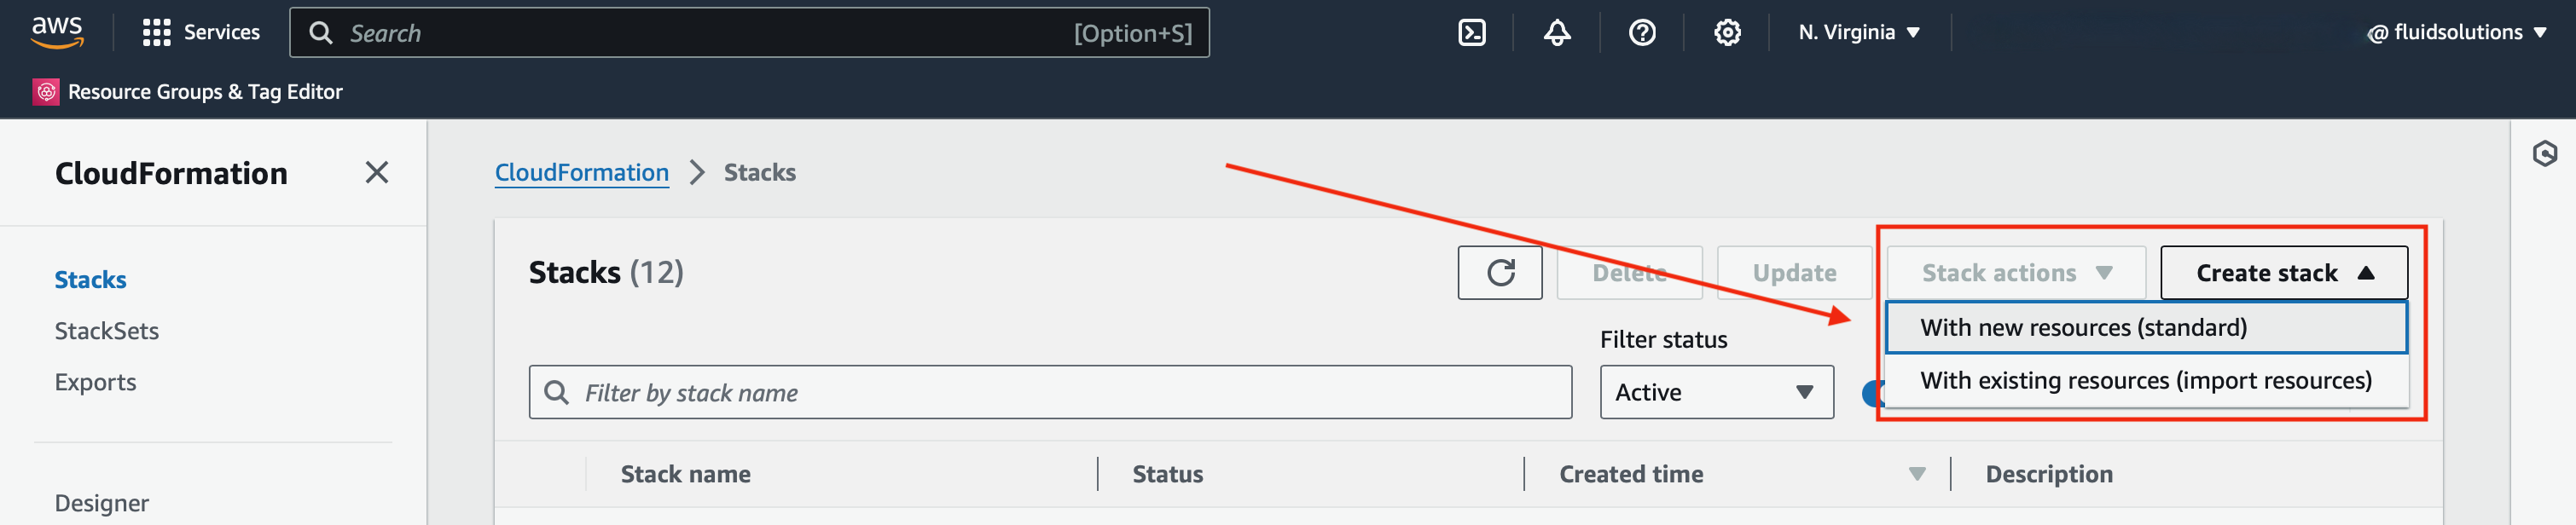
Once in the CloudFormation Dashboard,
search for the drop-down menu in Create Stack
and select With new resources (standard).
Now, under Prerequisite - Prepare template,
select Template is ready and,
under Specify template,
select Upload a template file
and choose the file created at the beginning.

Continue the process and you will be able to set the name of the stack to create.

Click Next,
and you will arrive to a section titled
Configure stack options.
There is no need to change anything here,
so just click Next
and you will review the stack configuration.
At the bottom part,
under Capabilities,
mark the checkbox to give the CloudFormation service
the required permissions to create IAM resources.

Finish the setup
and the deployment of the stack will begin.
After a few moments,
you will see the stack created successfully.
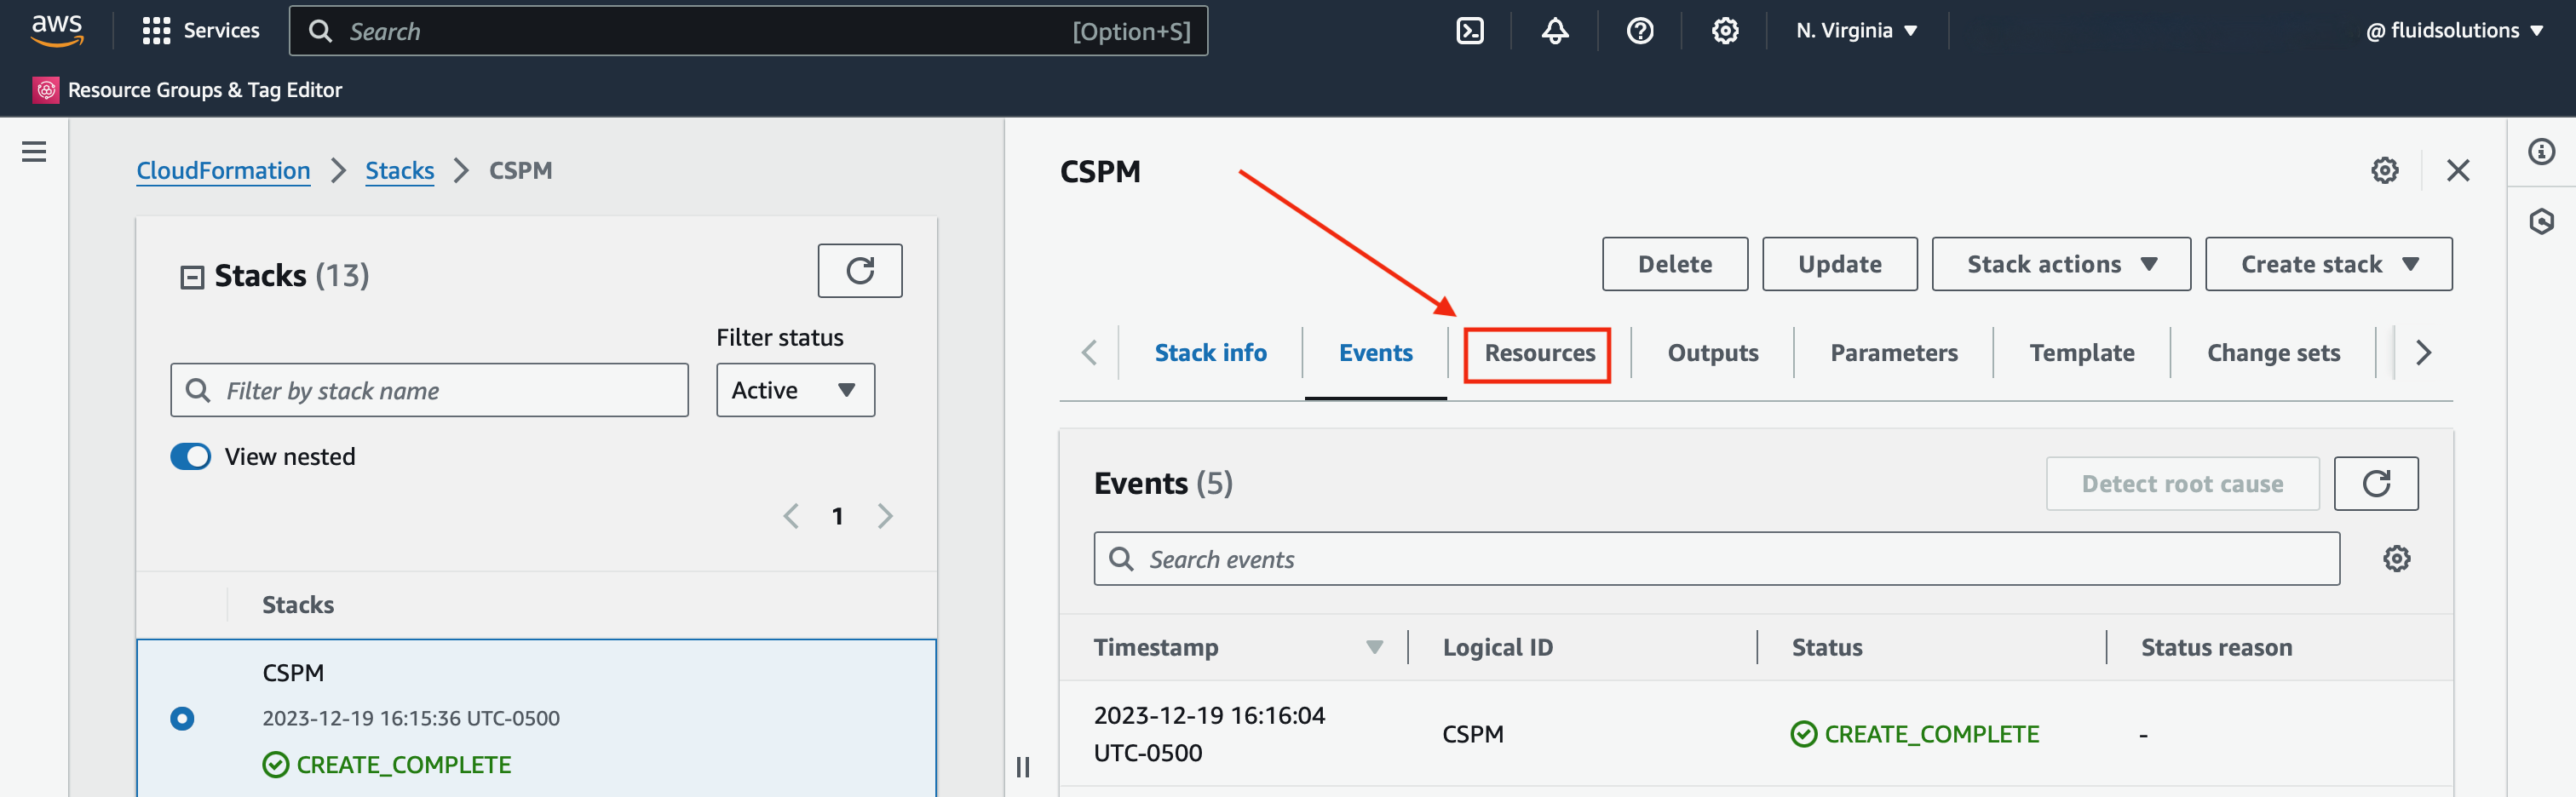
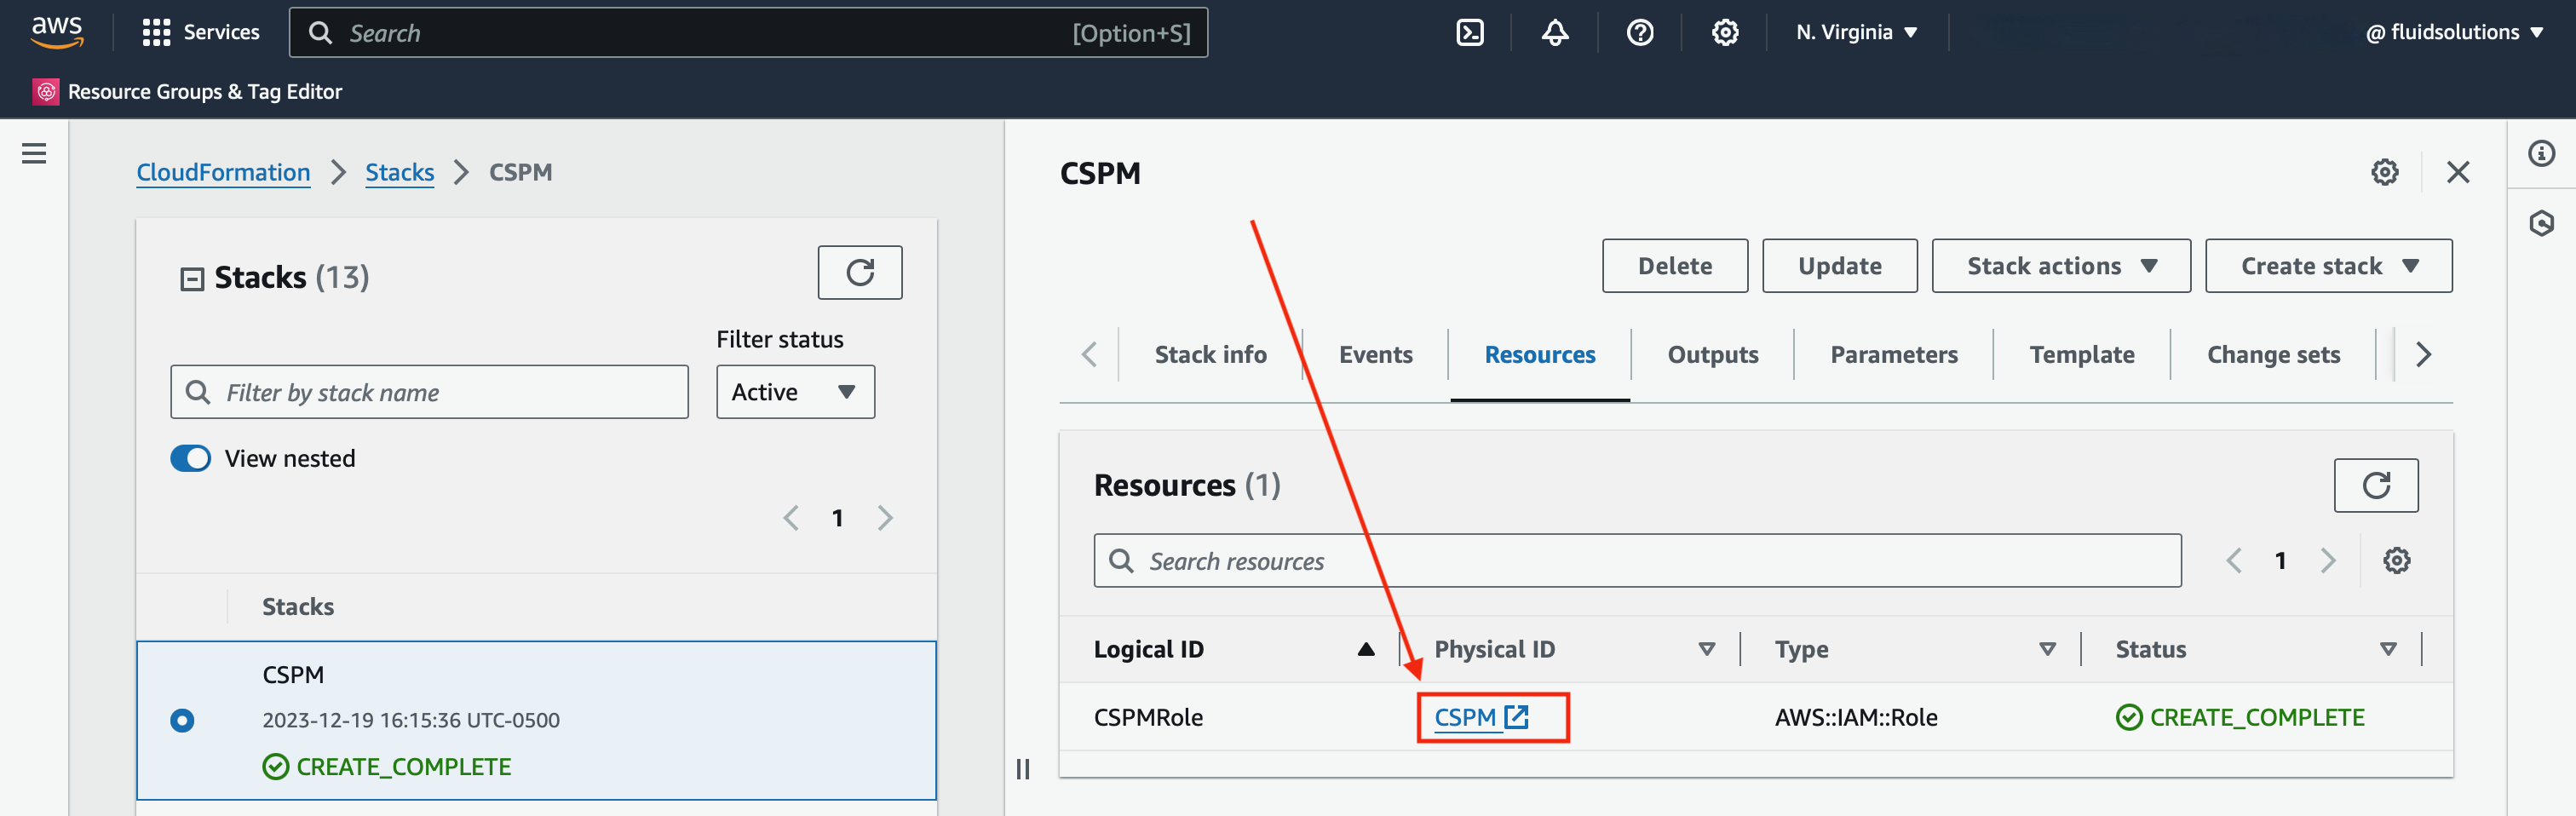
Navigate to the Resources tab
and you will see the created resources.
Click the Physical ID
and it will redirect you to the IAM dashboard,
where you will be able to get the role ARN
to set in Fluid Attacks' platform.
AWS setup on Fluid Attacks' platform
If you need to learn how to reach this point, go back to the CSPM setup
By selecting AWS, you will notice two things:
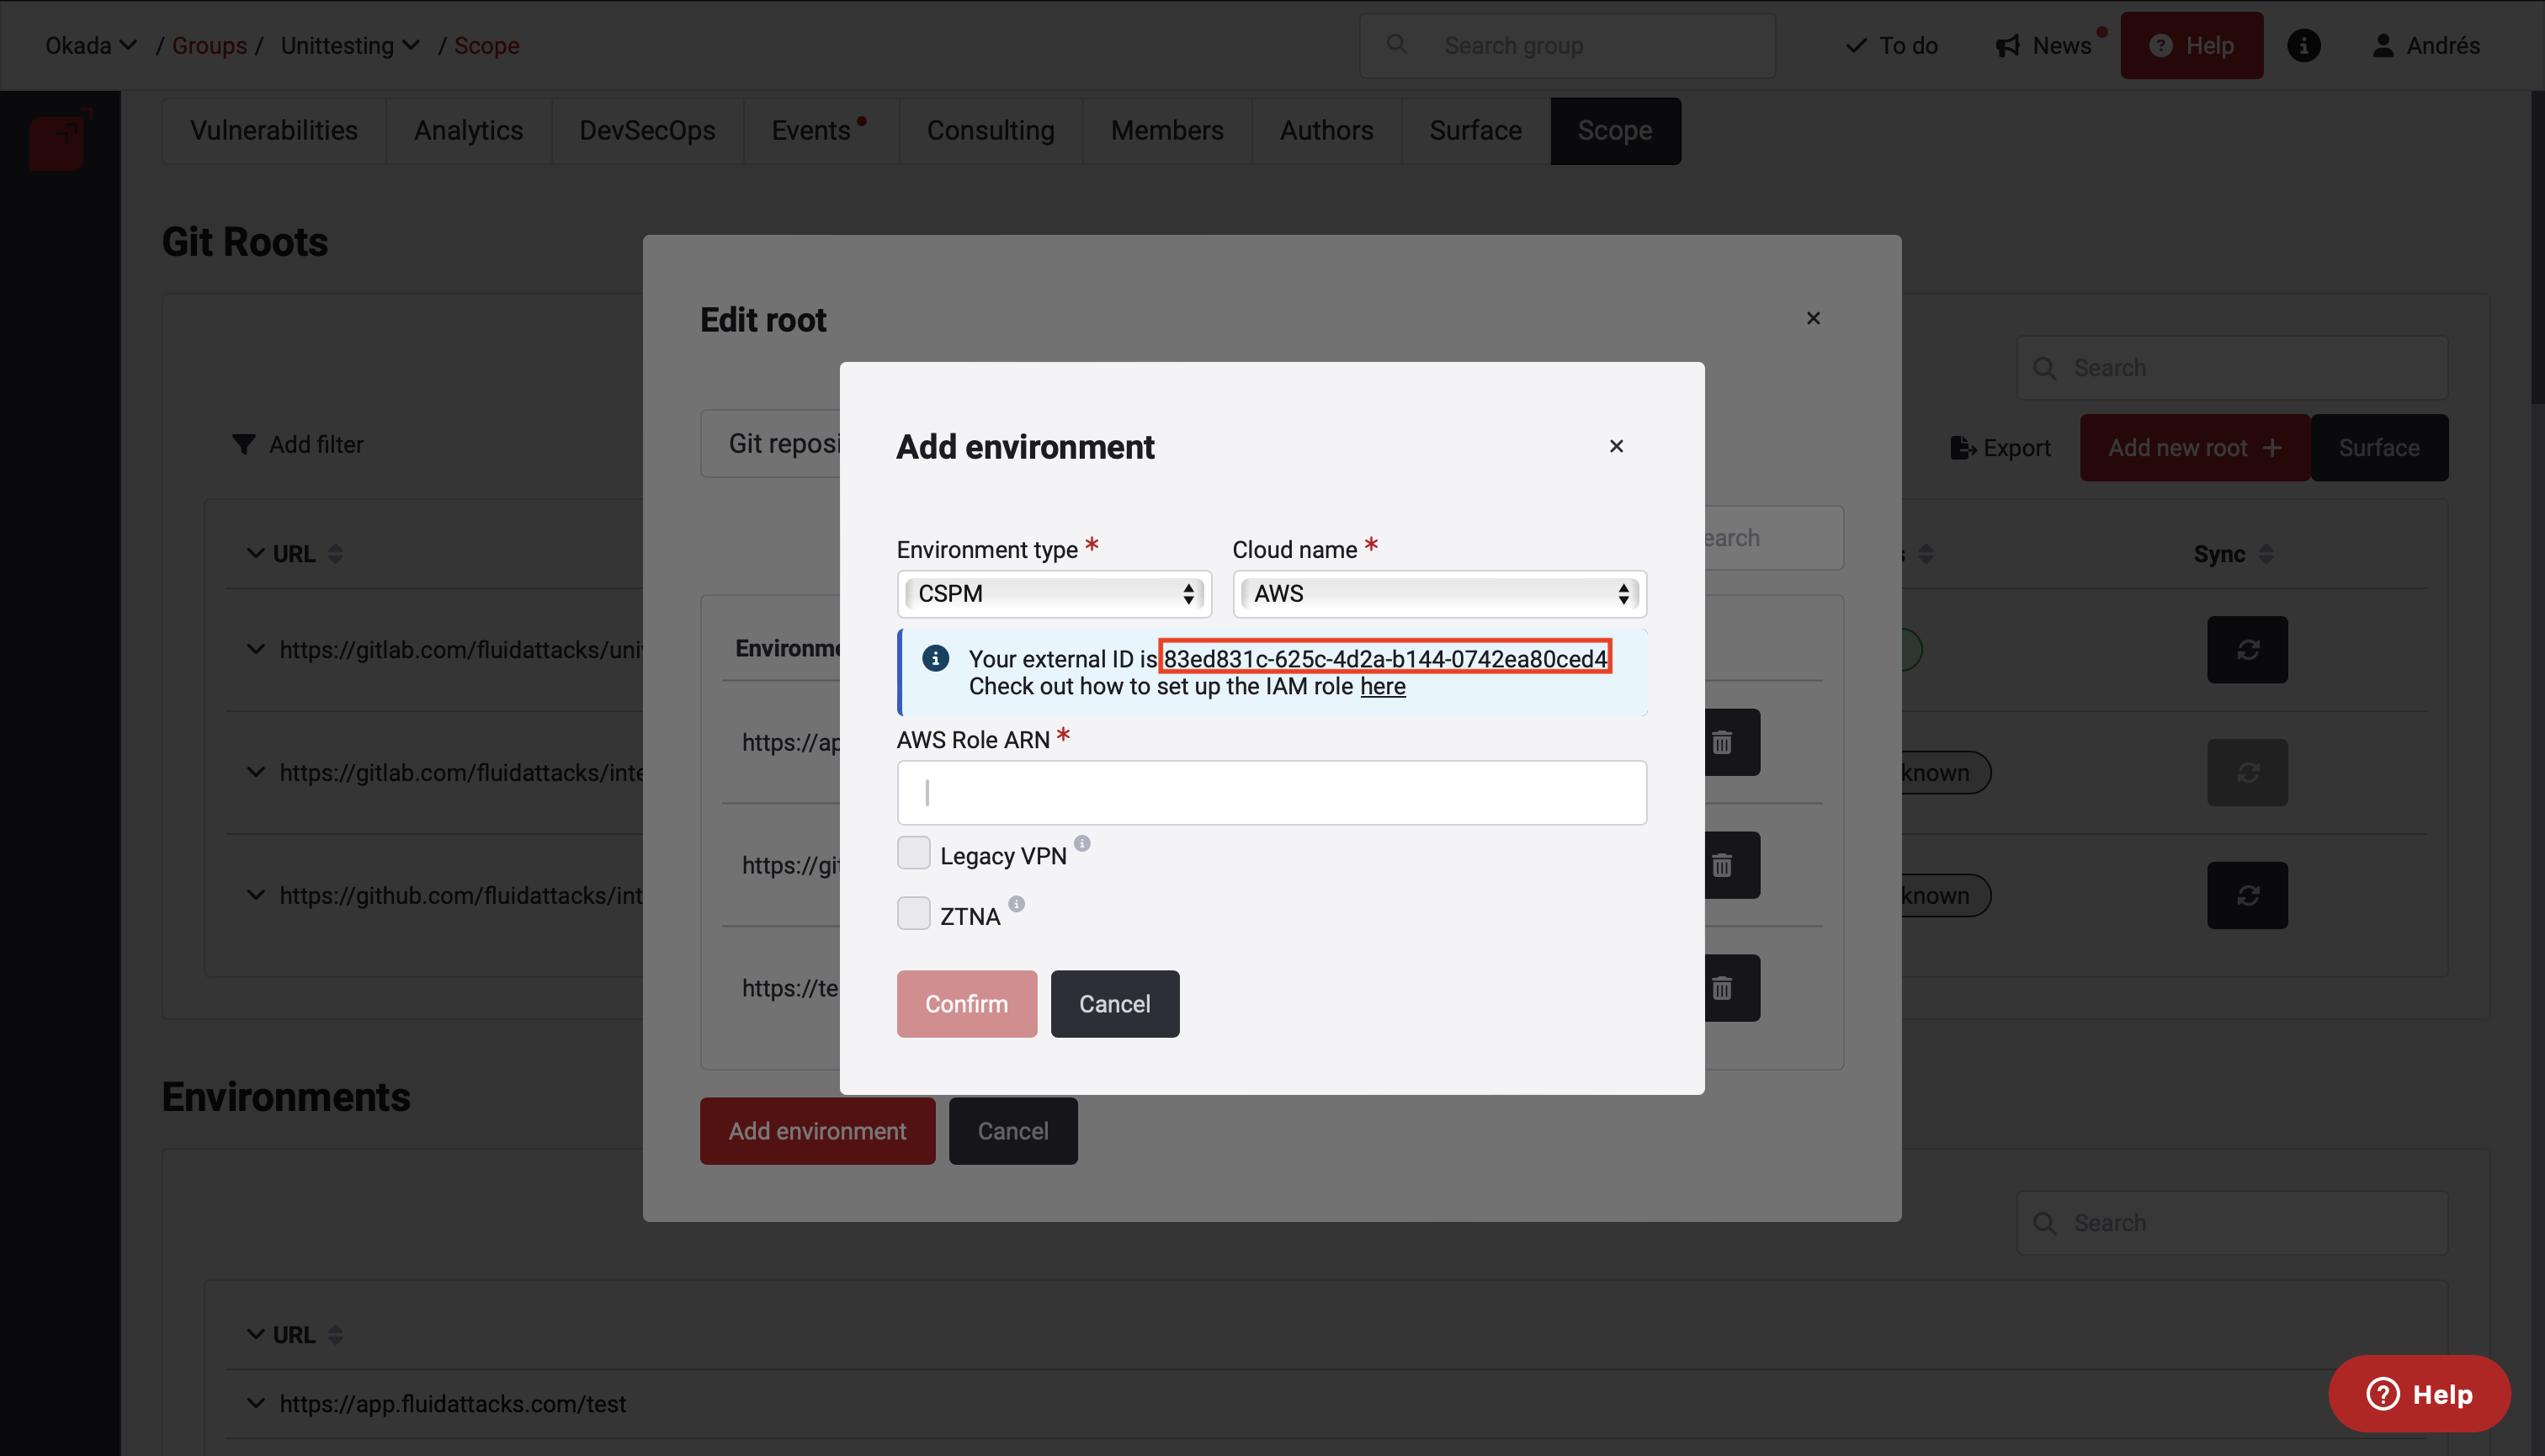
- An informational notification will pop up. Take note of the external ID, you will need this identifier to set up the IAM role.
- You will be asked for the ARN of the AWS IAM role Fluid Attacks scanner will assume to check your cloud resources. Check the step by step guide on how to create it here
Troubleshooting
If you are encountering issues when adding your AWS environment to the platform, check the following:
- The role you created
has the required permission
ReadOnlyAccess. - You specified the external ID assigned to your repository in the role trust policy.