Installation
Last updated: Sep 9, 2026
The Fluid Attacks MCP server, along with our entire suite of local tools and extensions, is available free of charge.
This guide explains how to install the Fluid Attacks MCP server in Claude Desktop, Claude Code, Cursor, VS Code, and Windsurf. Pick your AI assistant in the tabs below to see the matching configuration steps and a usage example. Besides, you can learn how to integrate Fluid Attacks security scanners into your software development lifecycle (SDLC) using AI agents.
Prerequisites
- To use the Fluid Attacks MCP Server, you need an AI assistant that supports MCP, such as Claude (via Cursor, Claude Desktop, VS Code, etc.).
- All MCP tools require authentication. Claude Desktop, Claude Code, VS Code, and Windsurf handle this through an OAuth flow with the Fluid Attacks platform. For Cursor, you need to provide a Fluid Attacks API token.
- Do you want to run security scans? If so, you need to have Docker installed. Also, it is recommended to configure an AGENTS.md file in the project root directory.
Remember that using Fluid Attacks' MCP server also consumes tokens from your AI assistant.
Configure your MCP client
Select your AI assistant in the tab list below. Each tab contains the configuration steps and a usage example specific to that client.
Install the runtime environment
Follow these steps to install Node.js, which is required for using Fluid Attacks' MCP server. If you already have Node.js v22 installed, simply skip to the next section according to your needs.
- It is recommended that you install Node Version Manager (nvm), as it allows you to have different versions of Node.js and switch between them according to your current needs. To install nvm, open your terminal and run the following:
curl -o- https://raw.githubusercontent.com/nvm-sh/nvm/v0.40.2/install.sh | bashClose and reopen your terminal or run the following command to load nvm into your current session:
\. "$HOME/.nvm/nvm.sh"- Install the Node.js version 22 with the following command (v18 or higher is required):
nvm install 22Set up in Claude
Set up Fluid Attacks' MCP server in Claude following these instructions:
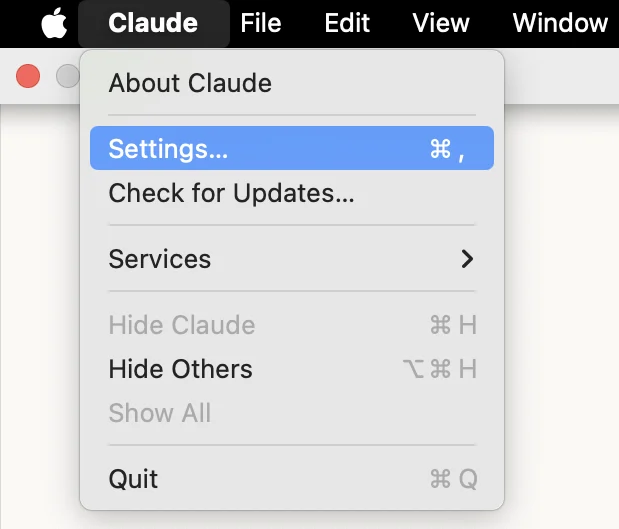
- Go to the menu bar, click on Claude and then Settings.
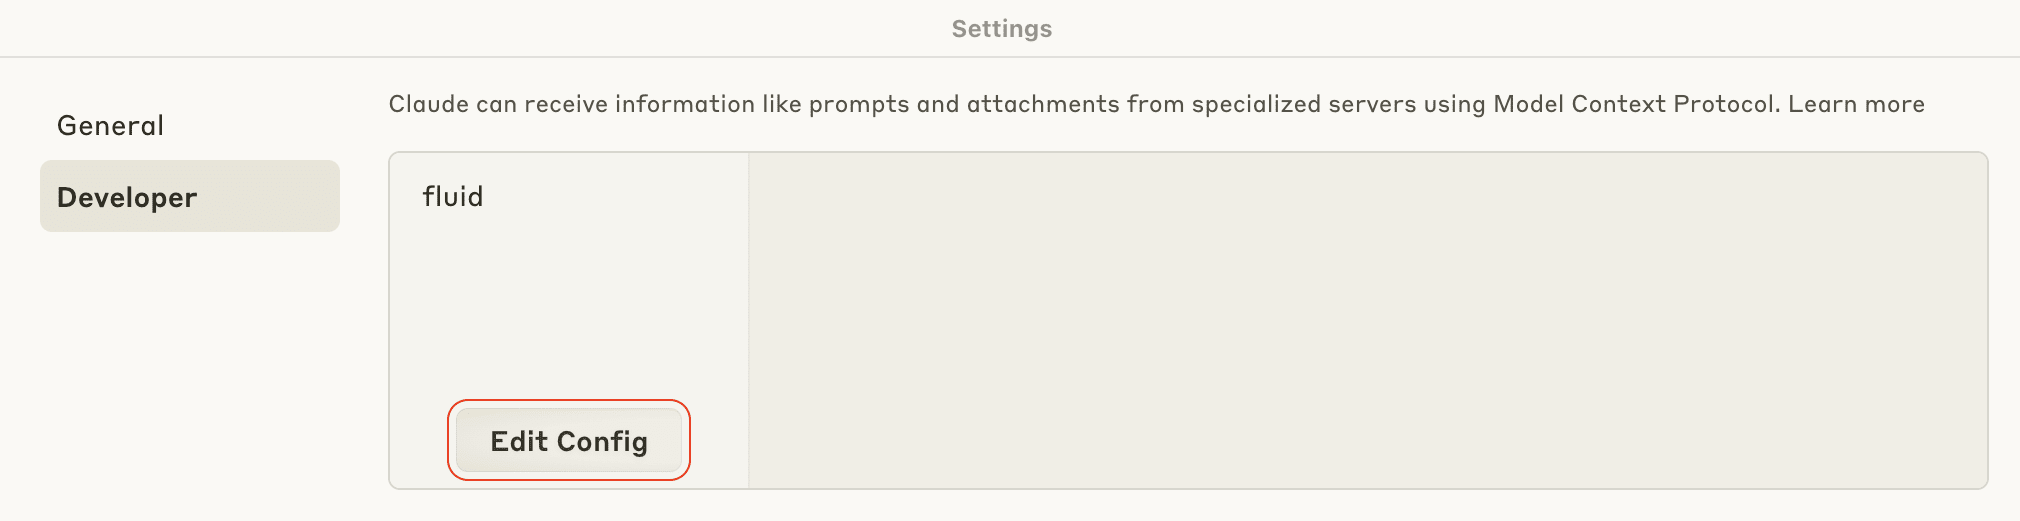
- Switch to the Developer tab and click the Edit Config button.
-
You are presented with a folder that contains the file claude_desktop_config.json. Open this file with a text editor.
-
Paste the following into the configuration file:
{ "mcpServers": { "fluidattacks-mcp": { "command": "npx", "args": [ "-y", "mcp-remote", "https://app.fluidattacks.com/mcp/messages/" ] } } } -
Save the file and close both it and Claude.
-
Reopen Claude Desktop. On startup,
mcp-remoteopens your default browser and redirects you to the Fluid Attacks sign-in page, where you grant Claude Desktop access to the information stored in your Fluid Attacks platform account. After you authorize the request, the browser returns to Claude Desktop and thefluidattacks-mcpserver appears as connected.
You can now start chatting with the platform.
Usage example
Once the Fluid Attacks MCP server is connected to your AI assistant, you can request vulnerability information or security scans using natural language. The same prompts work across Claude Desktop, Claude Code, Cursor, VS Code, and Windsurf.
For example, to generate a vulnerability report for a specific group in a specific organization, use the following prompt:
Using Fluid Attacks' API, please generate a one-page report of the vulnerabilities found in the Narrabri group of the Imamura organization.
Or, to query the highest severity vulnerability in a specific file:
From the Fluid Attacks API, what is the highest severity (CVSS) vulnerability in the basketitems.ts file of the Clickable group within the Imamura organization?
Your AI assistant asks for permission
before running each tool exposed by the MCP server
(for example,
fetch_weakness_vulnerabilities,
which retrieves vulnerability information
such as status and severity).
After approval,
it returns the requested information
and can help you remediate findings directly in your codebase.
Read a description of each tool and capability.
Sandbox configuration
If you need to skip the interactive OAuth flow
(for example, when running the MCP server in a sandbox or headless environment,
invoking it from CI,
or scripting integration tests),
you can authenticate by passing a
Fluid Attacks API token
in the Authorization header.
Add the headers field to the server entry in your client configuration
and set Authorization to Bearer <YOUR_API_TOKEN>.
The example below uses the .mcp.json format
shared by Claude Code and VS Code:
{
  "mcpServers": {
    "fluidattacks-mcp": {
      "type": "http",
      "url": "https://app.fluidattacks.com/mcp/messages/",
      "headers": {
        "Authorization": "Bearer <YOUR_API_TOKEN>"
      }
    }
  }
}
For Windsurf,
use the serverUrl field together with headers
in ~/.codeium/windsurf/mcp_config.json:
{
  "mcpServers": {
    "fluidattacks-mcp": {
      "serverUrl": "https://app.fluidattacks.com/mcp/messages/",
      "headers": {
        "Authorization": "Bearer <YOUR_API_TOKEN>"
      }
    }
  }
}
For Claude Desktop,
the type and headers fields shown above are not supported;
claude_desktop_config.json only accepts local (stdio) servers.
Pass the token through the mcp-remote command instead,
using a --header argument:
{
  "mcpServers": {
    "fluidattacks-mcp": {
      "command": "npx",
      "args": [
        "-y",
        "mcp-remote",
        "https://app.fluidattacks.com/mcp/messages/",
        "--header",
        "Authorization:Bearer <YOUR_API_TOKEN>"
      ]
    }
  }
}
Treat your API token as a secret. Where your client supports it, prefer
environment variable interpolation (for example, Windsurf's
${env:FLUIDATTACKS_TOKEN}) over writing the token into config files. Claude
Desktop does not interpolate variables in claude_desktop_config.json, so the
token is stored in that file; keep it out of version control and restrict its
permissions.
Security considerations
- Data sensitivity: Be cautious when sharing vulnerability data.
Integrate our scanners into your SDLC using AI
When using AI-powered development tools, such as Cursor, GitHub Copilot, or similar AI coding assistants, you can configure them to automatically execute Fluid Attacks security scanners at appropriate points in your SDLC. This integration helps you ensure that security vulnerabilities are detected and addressed early.
Before integrating our security scanners with AI agents, make sure you have met the prerequisites (Docker installed and Fluid Attacks' MCP server configured in your AI development environment), and that you have write access to your project directory for configuration files and scan results.
Add AGENTS.md to your project using Fluid Attacks' MCP server
On the chat of your AI agent,
start by typing /fluidattacks-mcp/
and then select the following command:
/fluidattacks-mcp/config_agents_mdAdd AGENTS.md to your project manually
1. Create the AGENTS.md file
Add an AGENTS.md file to your project root directory. This file contains instructions that AI agents will follow to determine when and how to execute security scanners.
The AGENTS.md file should be placed at the root of your project:
your-project/
├── AGENTS.md     # Add this file
├── src/
├── package.json
└── ...
2. Add the AGENTS.md content
# Project Instructions

## Execute Security Scanners

### Execute SCA Scanner When:

- New dependencies are added to the project
- Dependencies are updated to new versions
- Lock files are modified (e.g.,`package-lock.json`, `uv.lock`)
- User explicitly requests a dependency security scan
- Setting up a new project for the first time
- Before deploying to production
- Before pushing to the repository

### Execute SAST Scanner When:

- Source code changes are made to application files
- New features or modules are added
- Security-sensitive code is modified (authentication, authorization)
- User explicitly requests a code security scan
- Before committing significant code changes
- During code reviews
- Before deploying to production
- Before pushing to the repository

### Execute Both Scanners When:

- A complete security audit is needed
- Major project updates involving both code and dependencies
- Pre-deployment security check
- User requests a full security scan

## Prerequisites

- Docker installed on the system
- No Dockerfile creation needed - only download the Docker images
- Write access to the project directory for configuration files and results

## Fluid Attacks Scanner

### Purpose

Scan the project for vulnerabilities using the Fluid Attacks MCP tools.

### Step-by-Step Instructions

#### 1. Use Fluid Attacks MCP tools to configure and run the scanner

#### 2. Add the output file to .gitignore

#### 3. Remediate vulnerabilities

- Review the output file
- If there are vulnerabilities, remediate them

## Best Practices for Agents

### 1. Configuration File Management

- Always verify the correct paths for include/exclude before running
- Adjust configuration based on project structure
- Use `.gitignore` as a reference for exclude patterns
- Store configuration files in the project root and add them to .gitignore

## When to Run What

| Scenario                      | Scanner | Priority |
| ----------------------------- | ------- | -------- |
| New dependency added          | SCA     | High     |
| Code changes in auth/security | SAST    | Critical |
| Weekly security audit         | Both    | Medium   |
| Pre-deployment check          | Both    | Critical |
| Dependency version update     | SCA     | High     |
| New feature development       | SAST    | Medium   |
| Third-party library added     | SCA     | High     |
| API endpoint changes          | SAST    | High     |

## Integration with Development Workflow

- On Code Changes: Run SAST if source files modified
- On Dependency Changes: Run SCA if dependency files modified
- On User Request: Run appropriate scanner(s)
- Help with remediation: Always create/update security reports
- Re-scan: After fixes to verify remediation
Troubleshooting
If the scanners are not being executed automatically:
- Verify that AGENTS.md exists in your project root
- Ensure the Fluid Attacks MCP server is properly configured
- Check that Docker is installed and running
- Verify that the AI agent has read access to AGENTS.md
- You can ask the AI agent to execute the scanners: "Run fluid attacks scanners."
If the scanners report false positives:
- Review the specific vulnerability details
- Adjust scanner configuration if needed
- Document acceptable exceptions in your project documentation
- Consider reaching out to Fluid Attacks support for clarification
Introduction to the MCP server
Get an introduction to our Model Context Protocol, its capabilities, purpose, and usage examples.
Capabilities and use cases
Complete reference for Fluid Attacks MCP tools — analytics, vulnerability management, asset discovery, security scanning, DevSecOps, and knowledge base capabilities.