AWS CodeCommit
Last updated: Sep 30, 2026
To give Fluid Attacks access to your CodeCommit repositories, make an IAM role with cross-account access.
The role creation has these steps:
- Get the external ID that Fluid Attacks makes for your organization. To do this, open the platform. Go to Credentials > Add credentials > Add manually. Select AWS Role as the credentials type.
- Make the IAM role with that external ID as a shared secret. The secret confirms that the role assumption requests come from Fluid Attacks.
- Add the Amazon Resource Name (ARN) of the role in the Fluid Attacks platform.
If your organization has some AWS accounts, make this role in each account that needs it. Then add the related ARN when you add credentials in the platform.
You can make the role with one of these methods:
Manual configuration from AWS Management Console
Follow these steps to make the role in the AWS user interface:
-
Sign in to the AWS Management Console. Use an account with permissions to make IAM roles and attach policies.
-
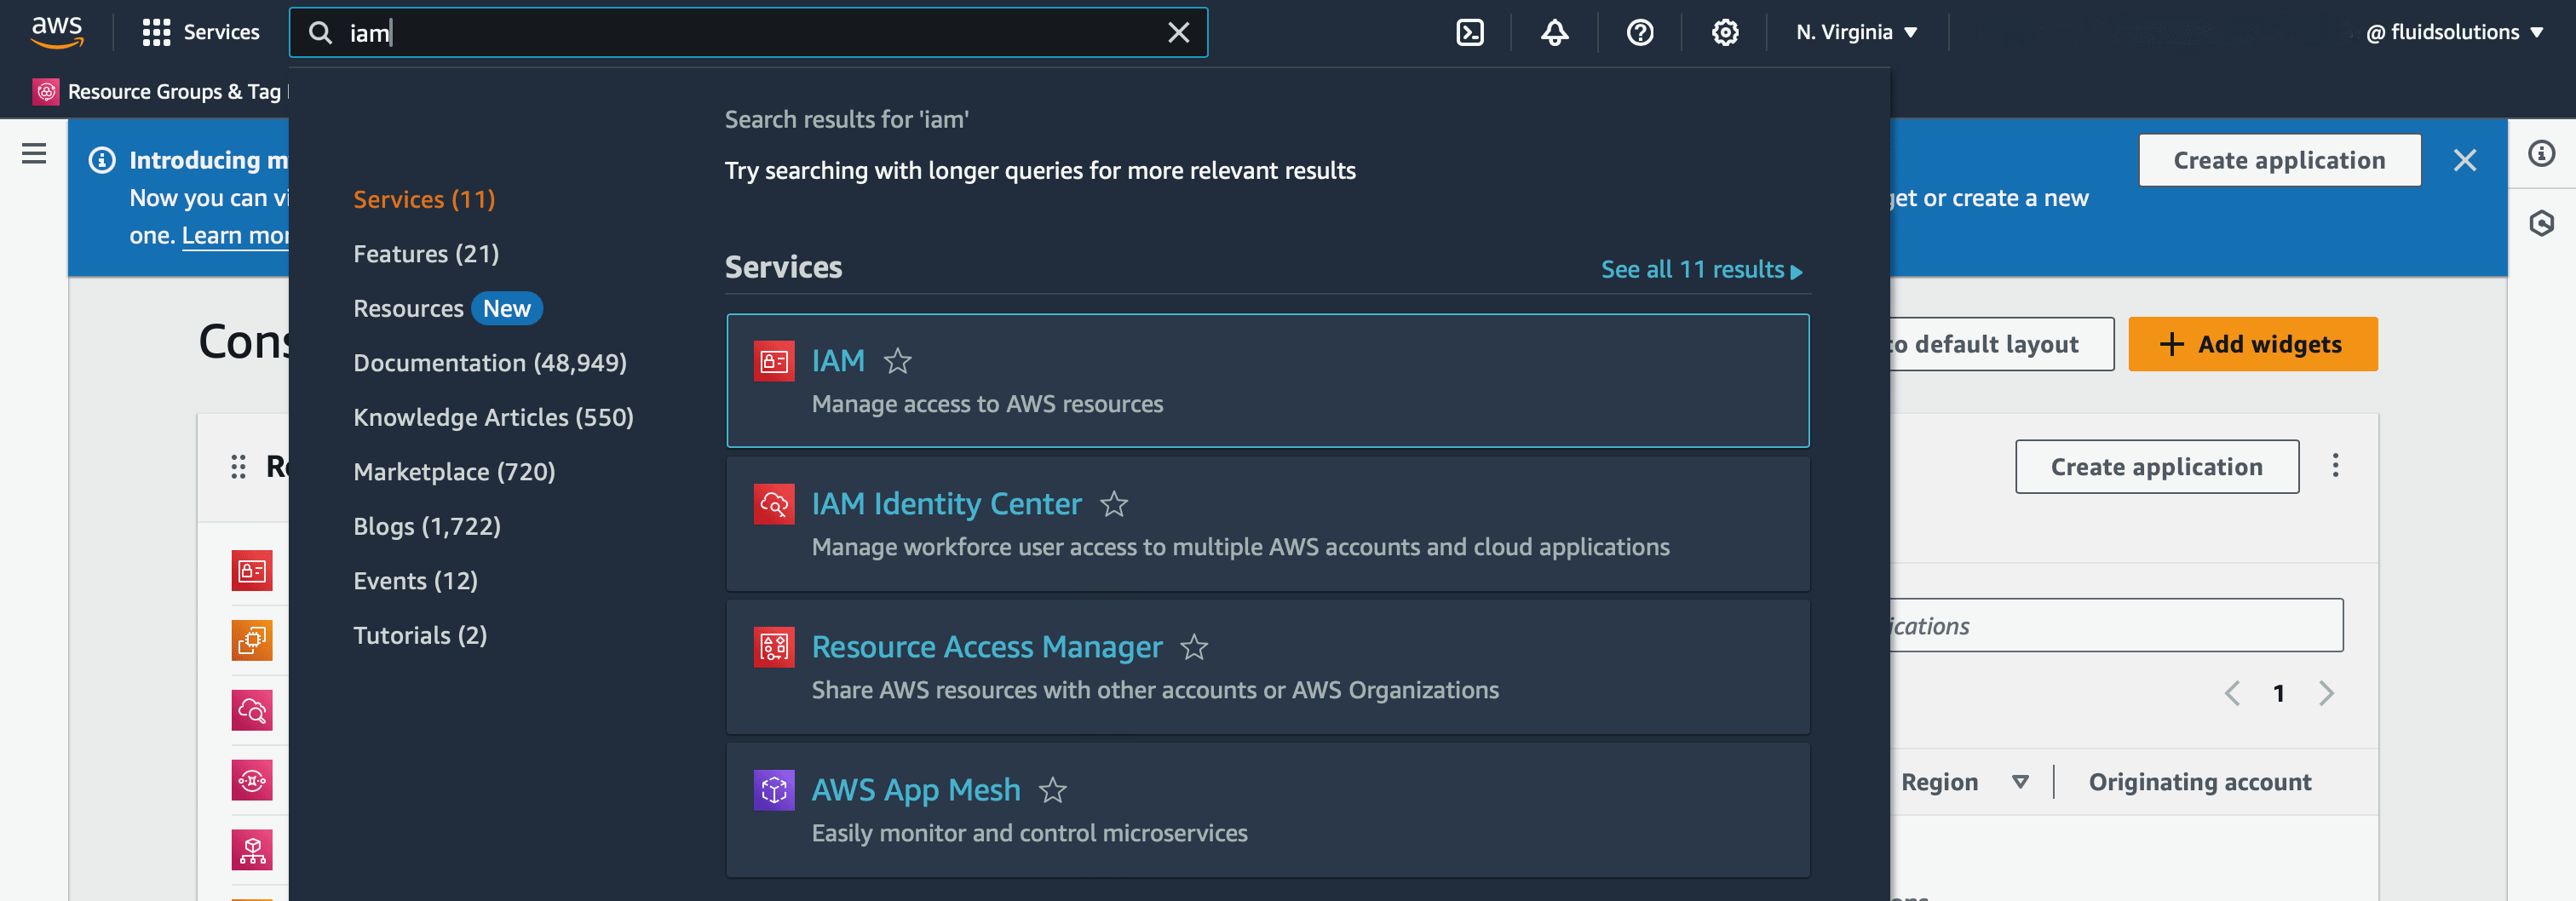
In the search bar, find the IAM service. Open it.
-
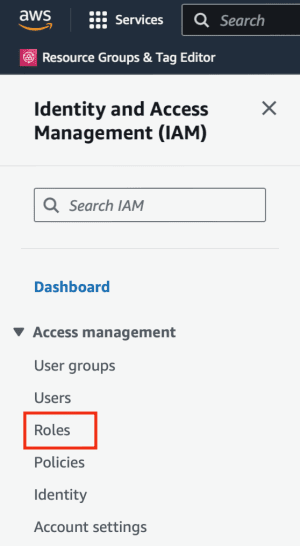
In the IAM Dashboard, click Roles in the left sidebar menu.
-
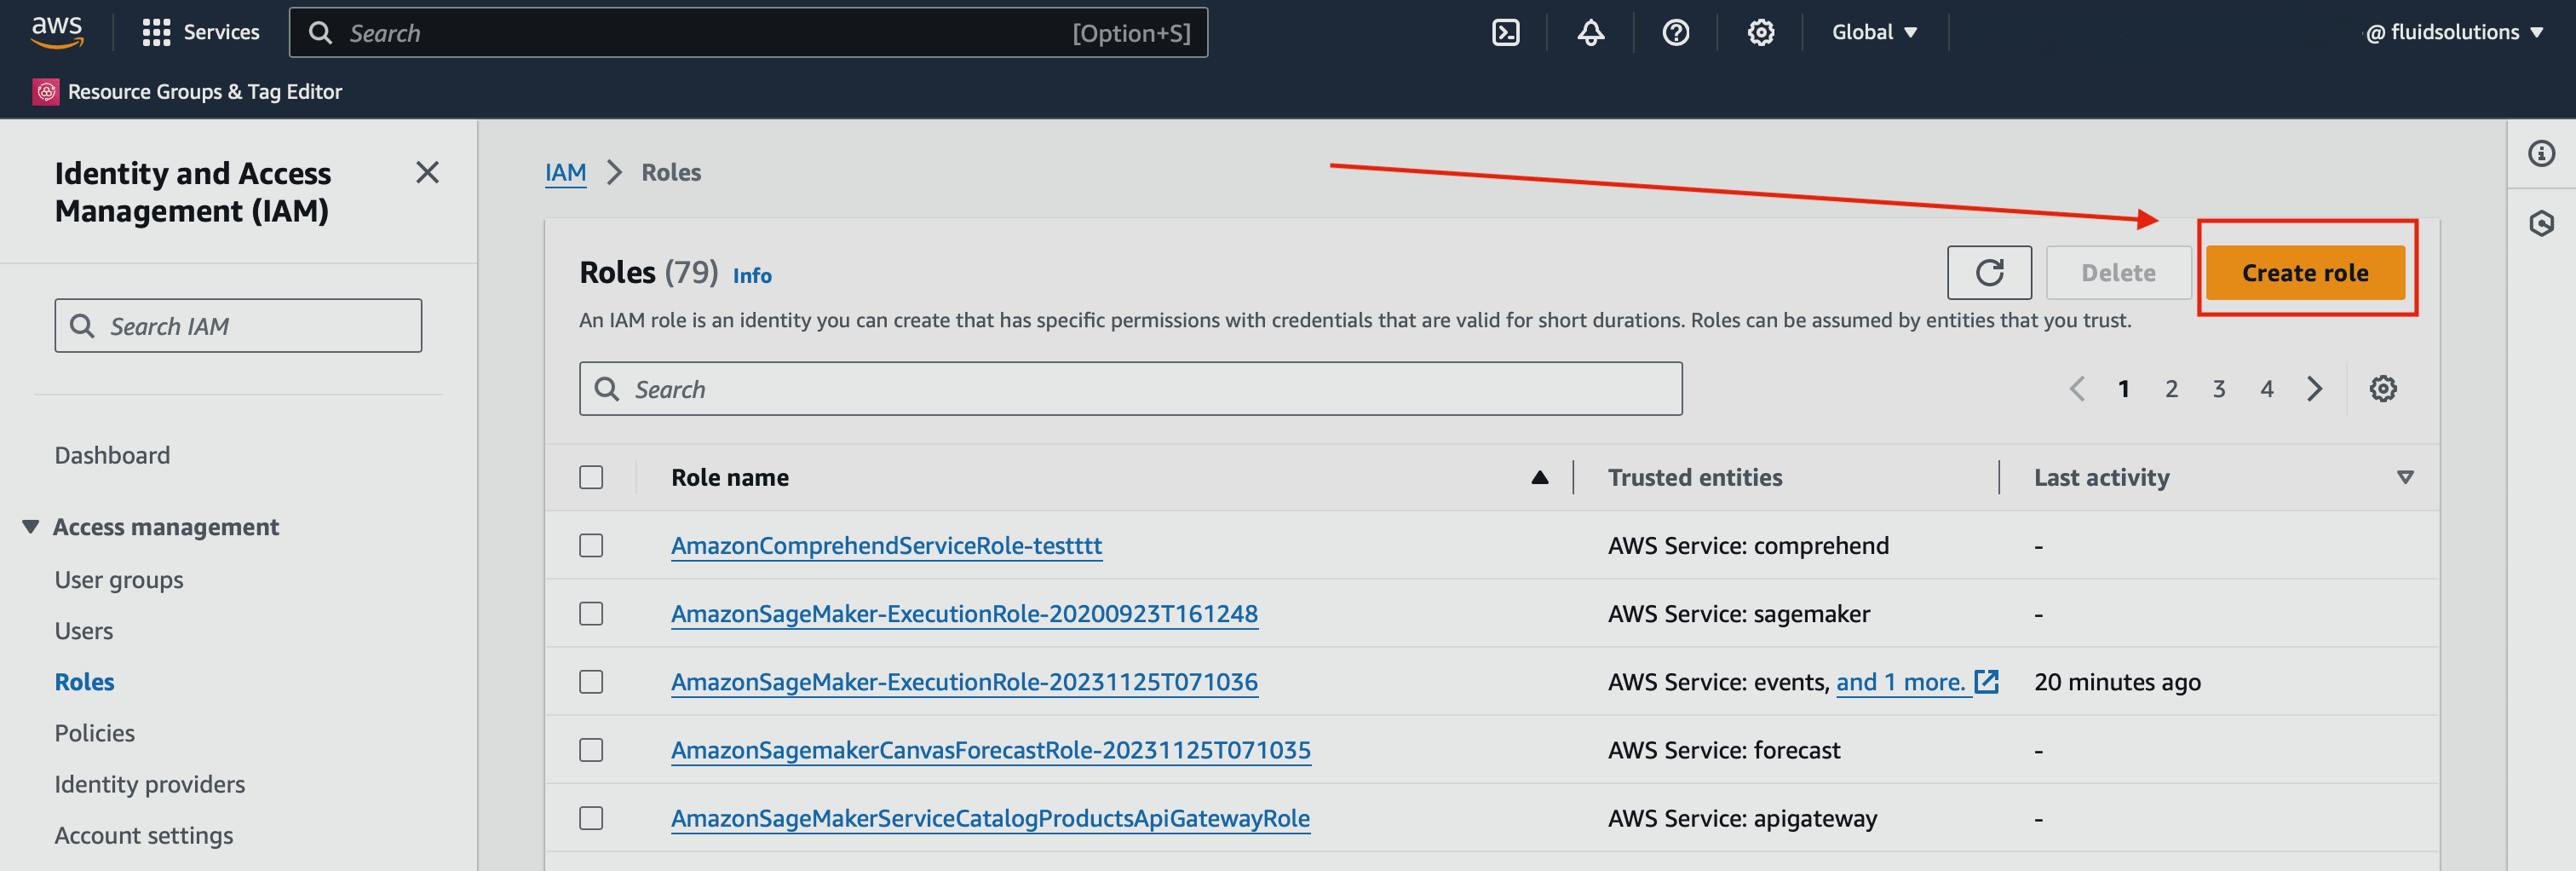
Click Create role.
-
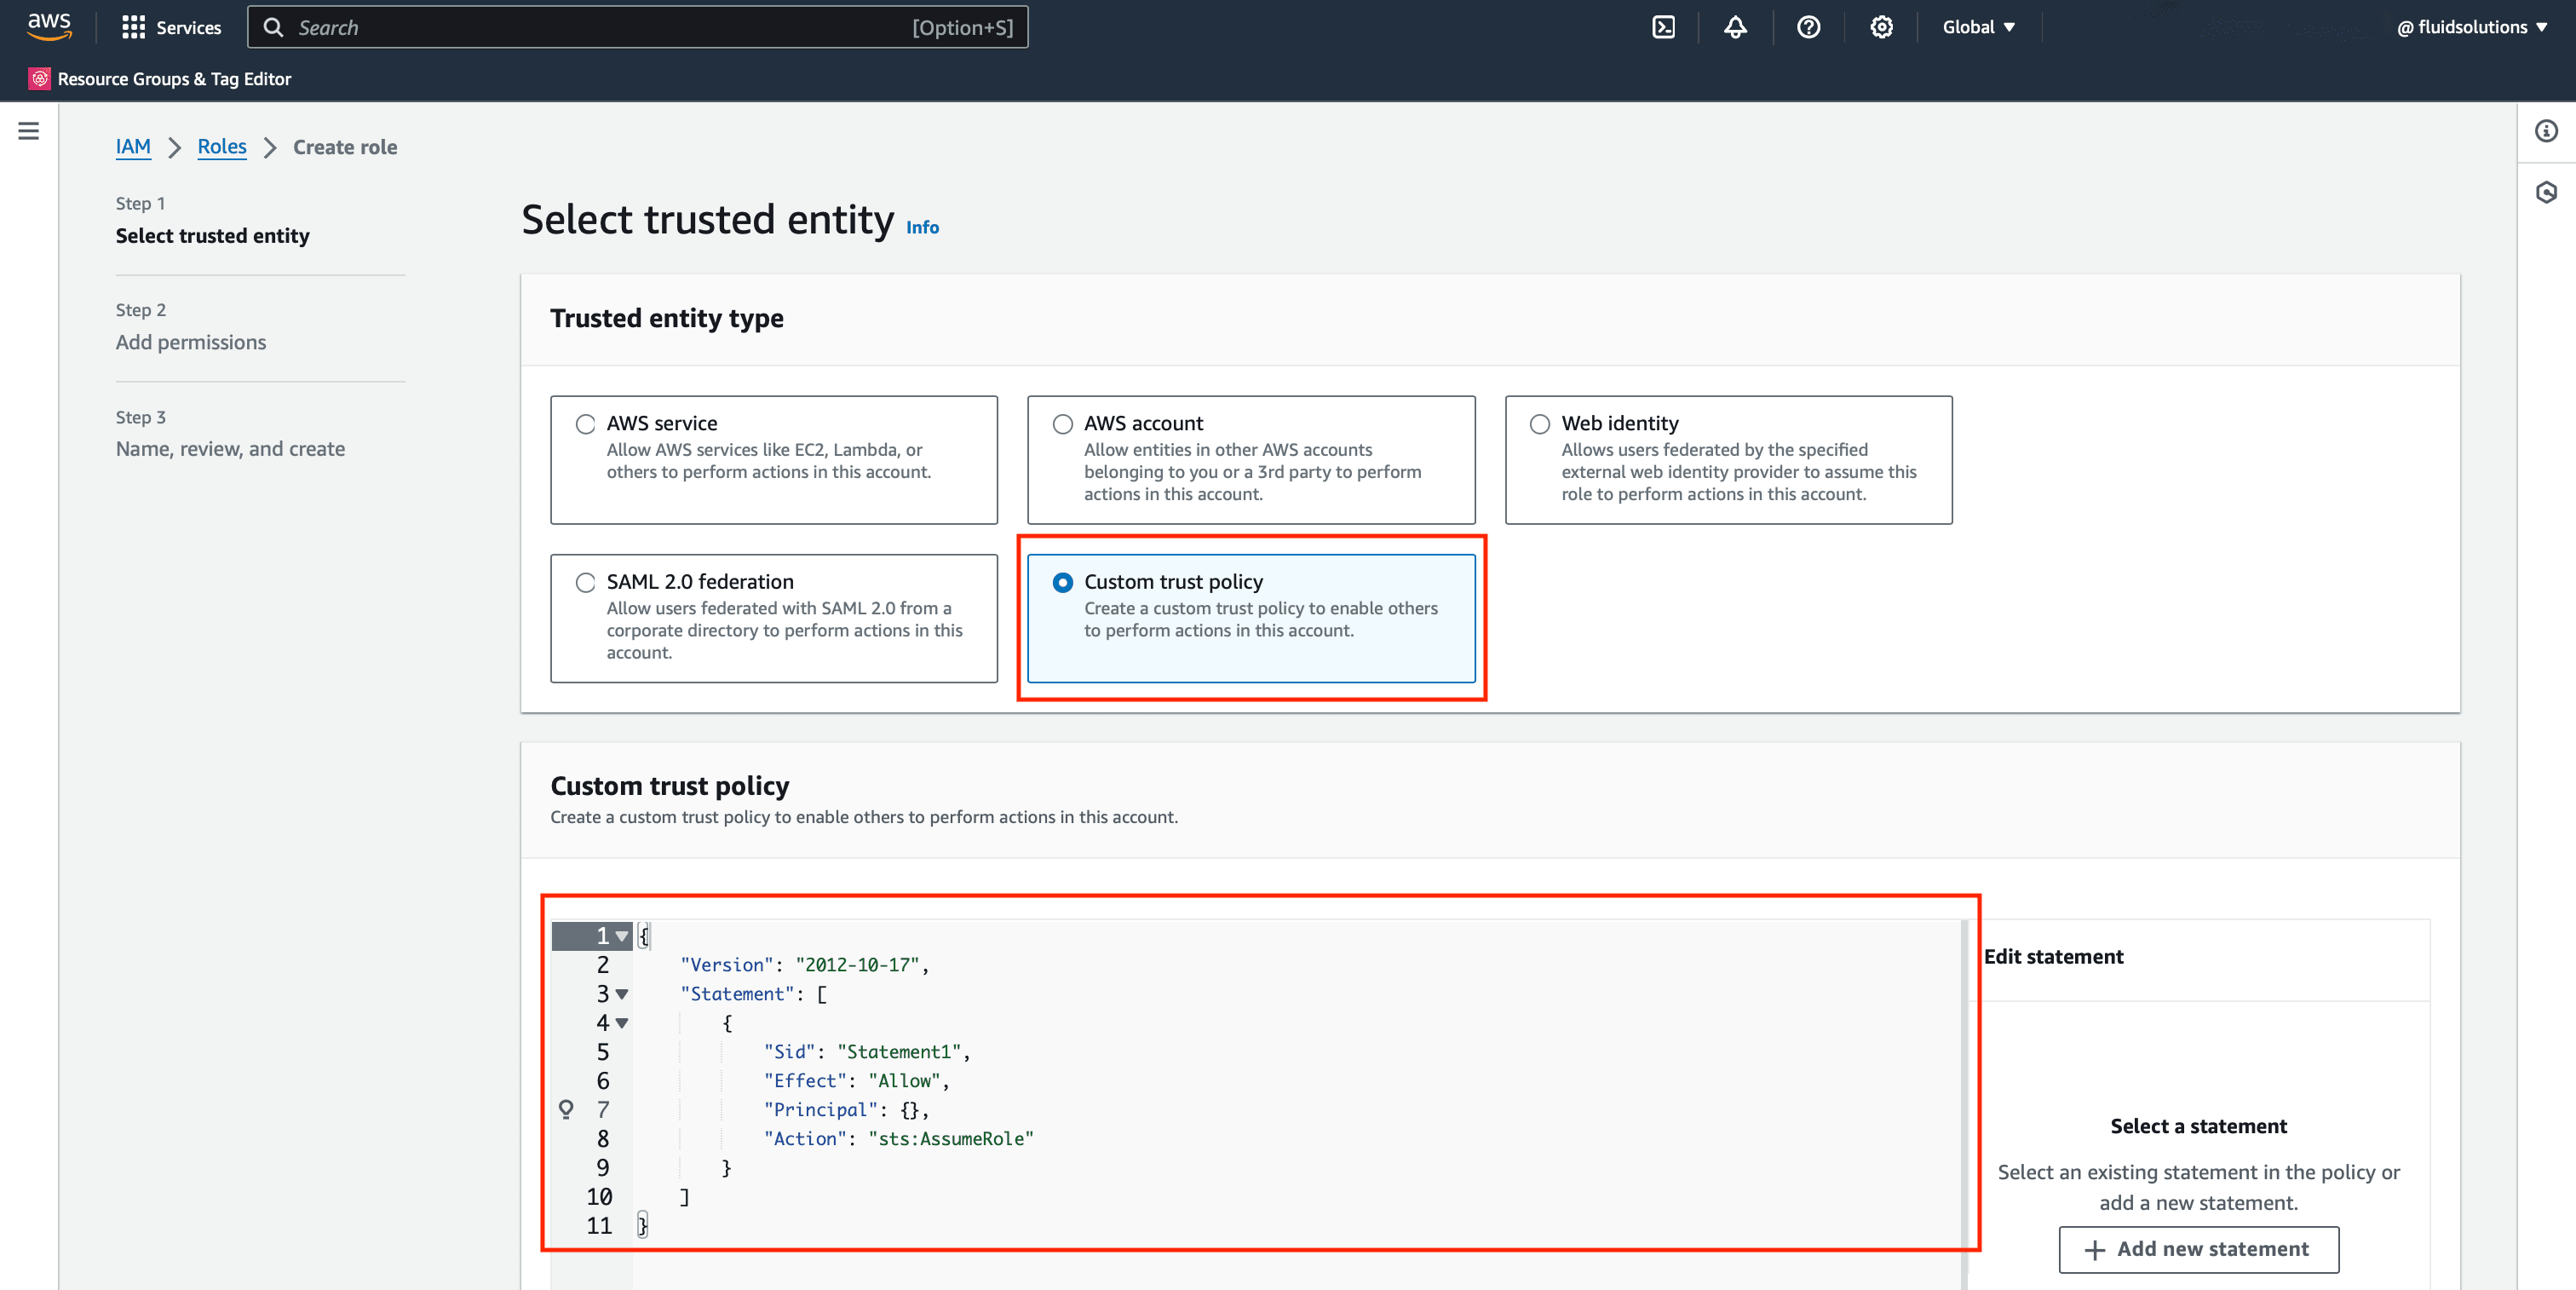
In the Trusted entity type section, select Custom trust policy.
-
In the code editor below, paste this JSON policy:
{
  "Version": "2012-10-17",
  "Statement": [
    {
      "Sid": "FluidAttacksAccess",
      "Effect": "Allow",
      "Principal": {
        "AWS": "*"
      },
      "Action": "sts:AssumeRole",
      "Condition": {
        "ArnEquals": {
          "aws:PrincipalArn": "arn:aws:iam::205810638802:role/prod_integrates"
        },
        "StringEquals": {
          "sts:ExternalId": "<YOUR-EXTERNAL-ID>"
        }
      }
    }
  ]
}
Replace <YOUR-EXTERNAL-ID> with the external ID
that Fluid Attacks made for your organization.
Elements of the trust policy: The trust policy has four primary elements:
- Principal (
"AWS": "*"): This field lets all AWS accounts assume the role. The conditions below limit the actual access. - Action (
sts:AssumeRole): This field lets external entities assume the role. - Condition (
aws:PrincipalArn): This condition limits the role assumption to the production role of Fluid Attacks only (arn:aws:iam::205810638802:role/prod_integrates). - Shared secret (
sts:ExternalId): Fluid Attacks and your organization share this secret. It confirms that the assumption requests come from Fluid Attacks. This prevents unauthorized access.
-
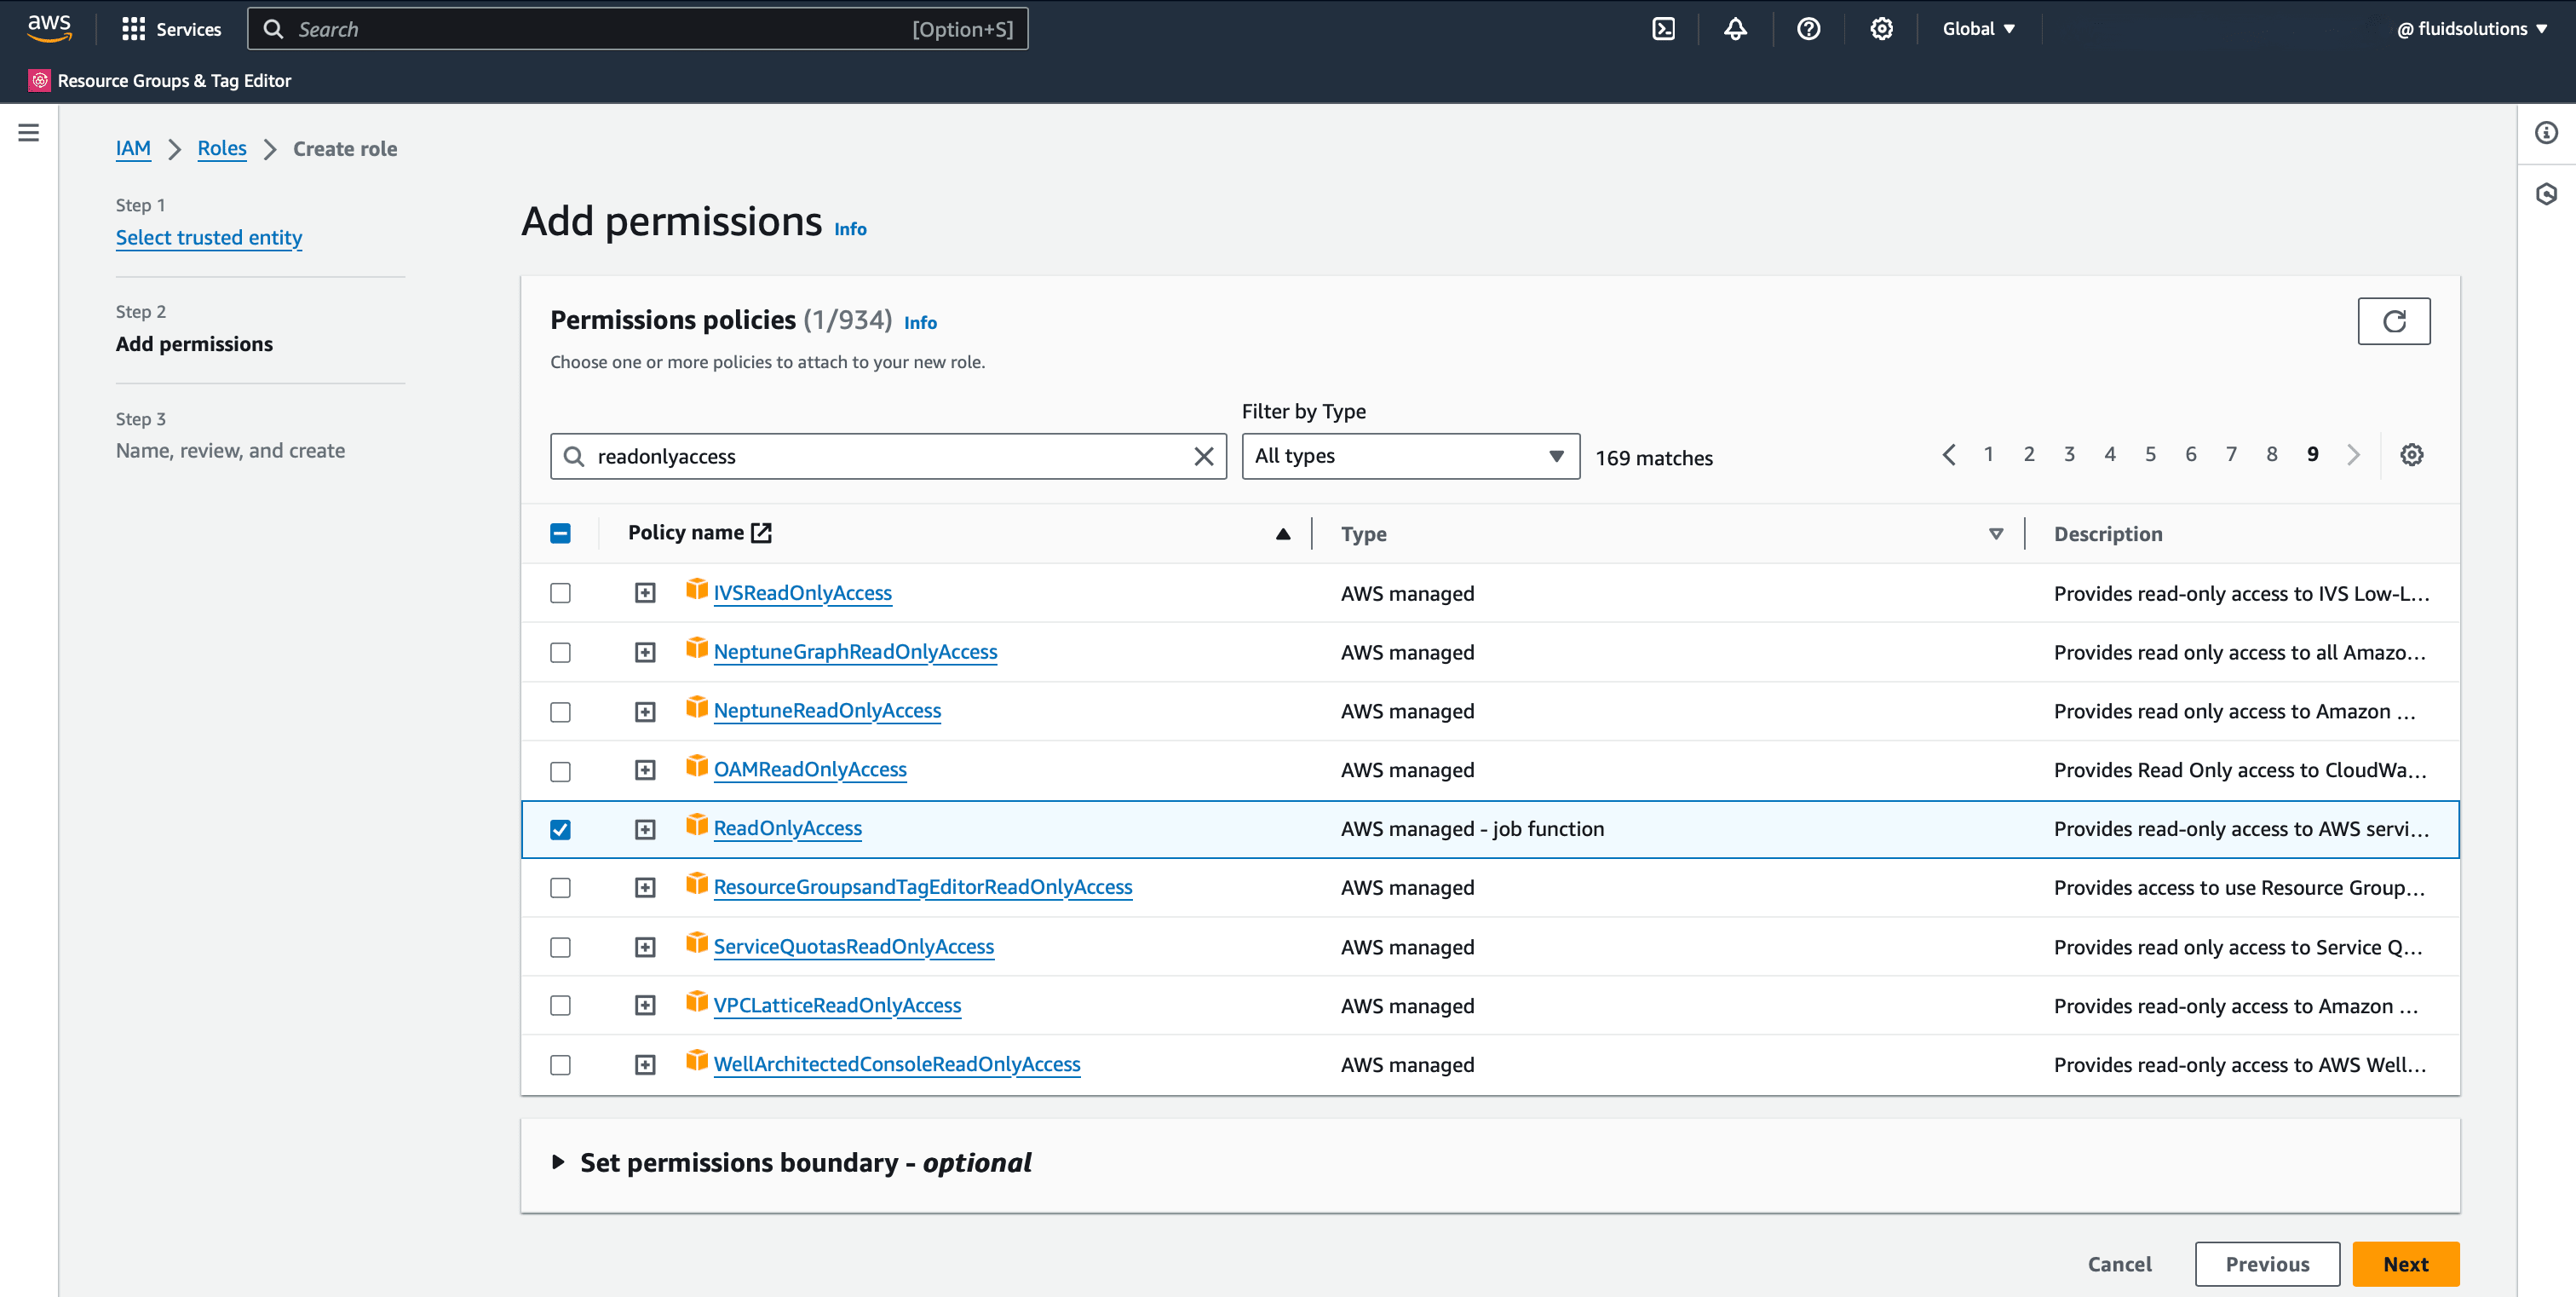
Give permissions to the role: Click Next to open the permissions configuration. You can select the ReadOnlyAccess permission. But step 8 shows a recommended user-managed policy to clone CodeCommit repositories.
-
Make or attach a policy that gives access to your CodeCommit repositories. Fluid Attacks recommends this policy, which follows the principle of least privilege:
{
  "Version": "2012-10-17",
  "Statement": [
    {
      "Sid": "CodeCommitAccess",
      "Effect": "Allow",
      "Action": ["codecommit:Get*", "codecommit:GitPull"],
      "Resource": ["<REPO-ARN>"]
    }
  ]
}
Replace
<REPO-ARN>with the ARN of your repository. To give access to some repositories, add their ARNs to the Resource array. -
Click Next to examine the role configuration.
-
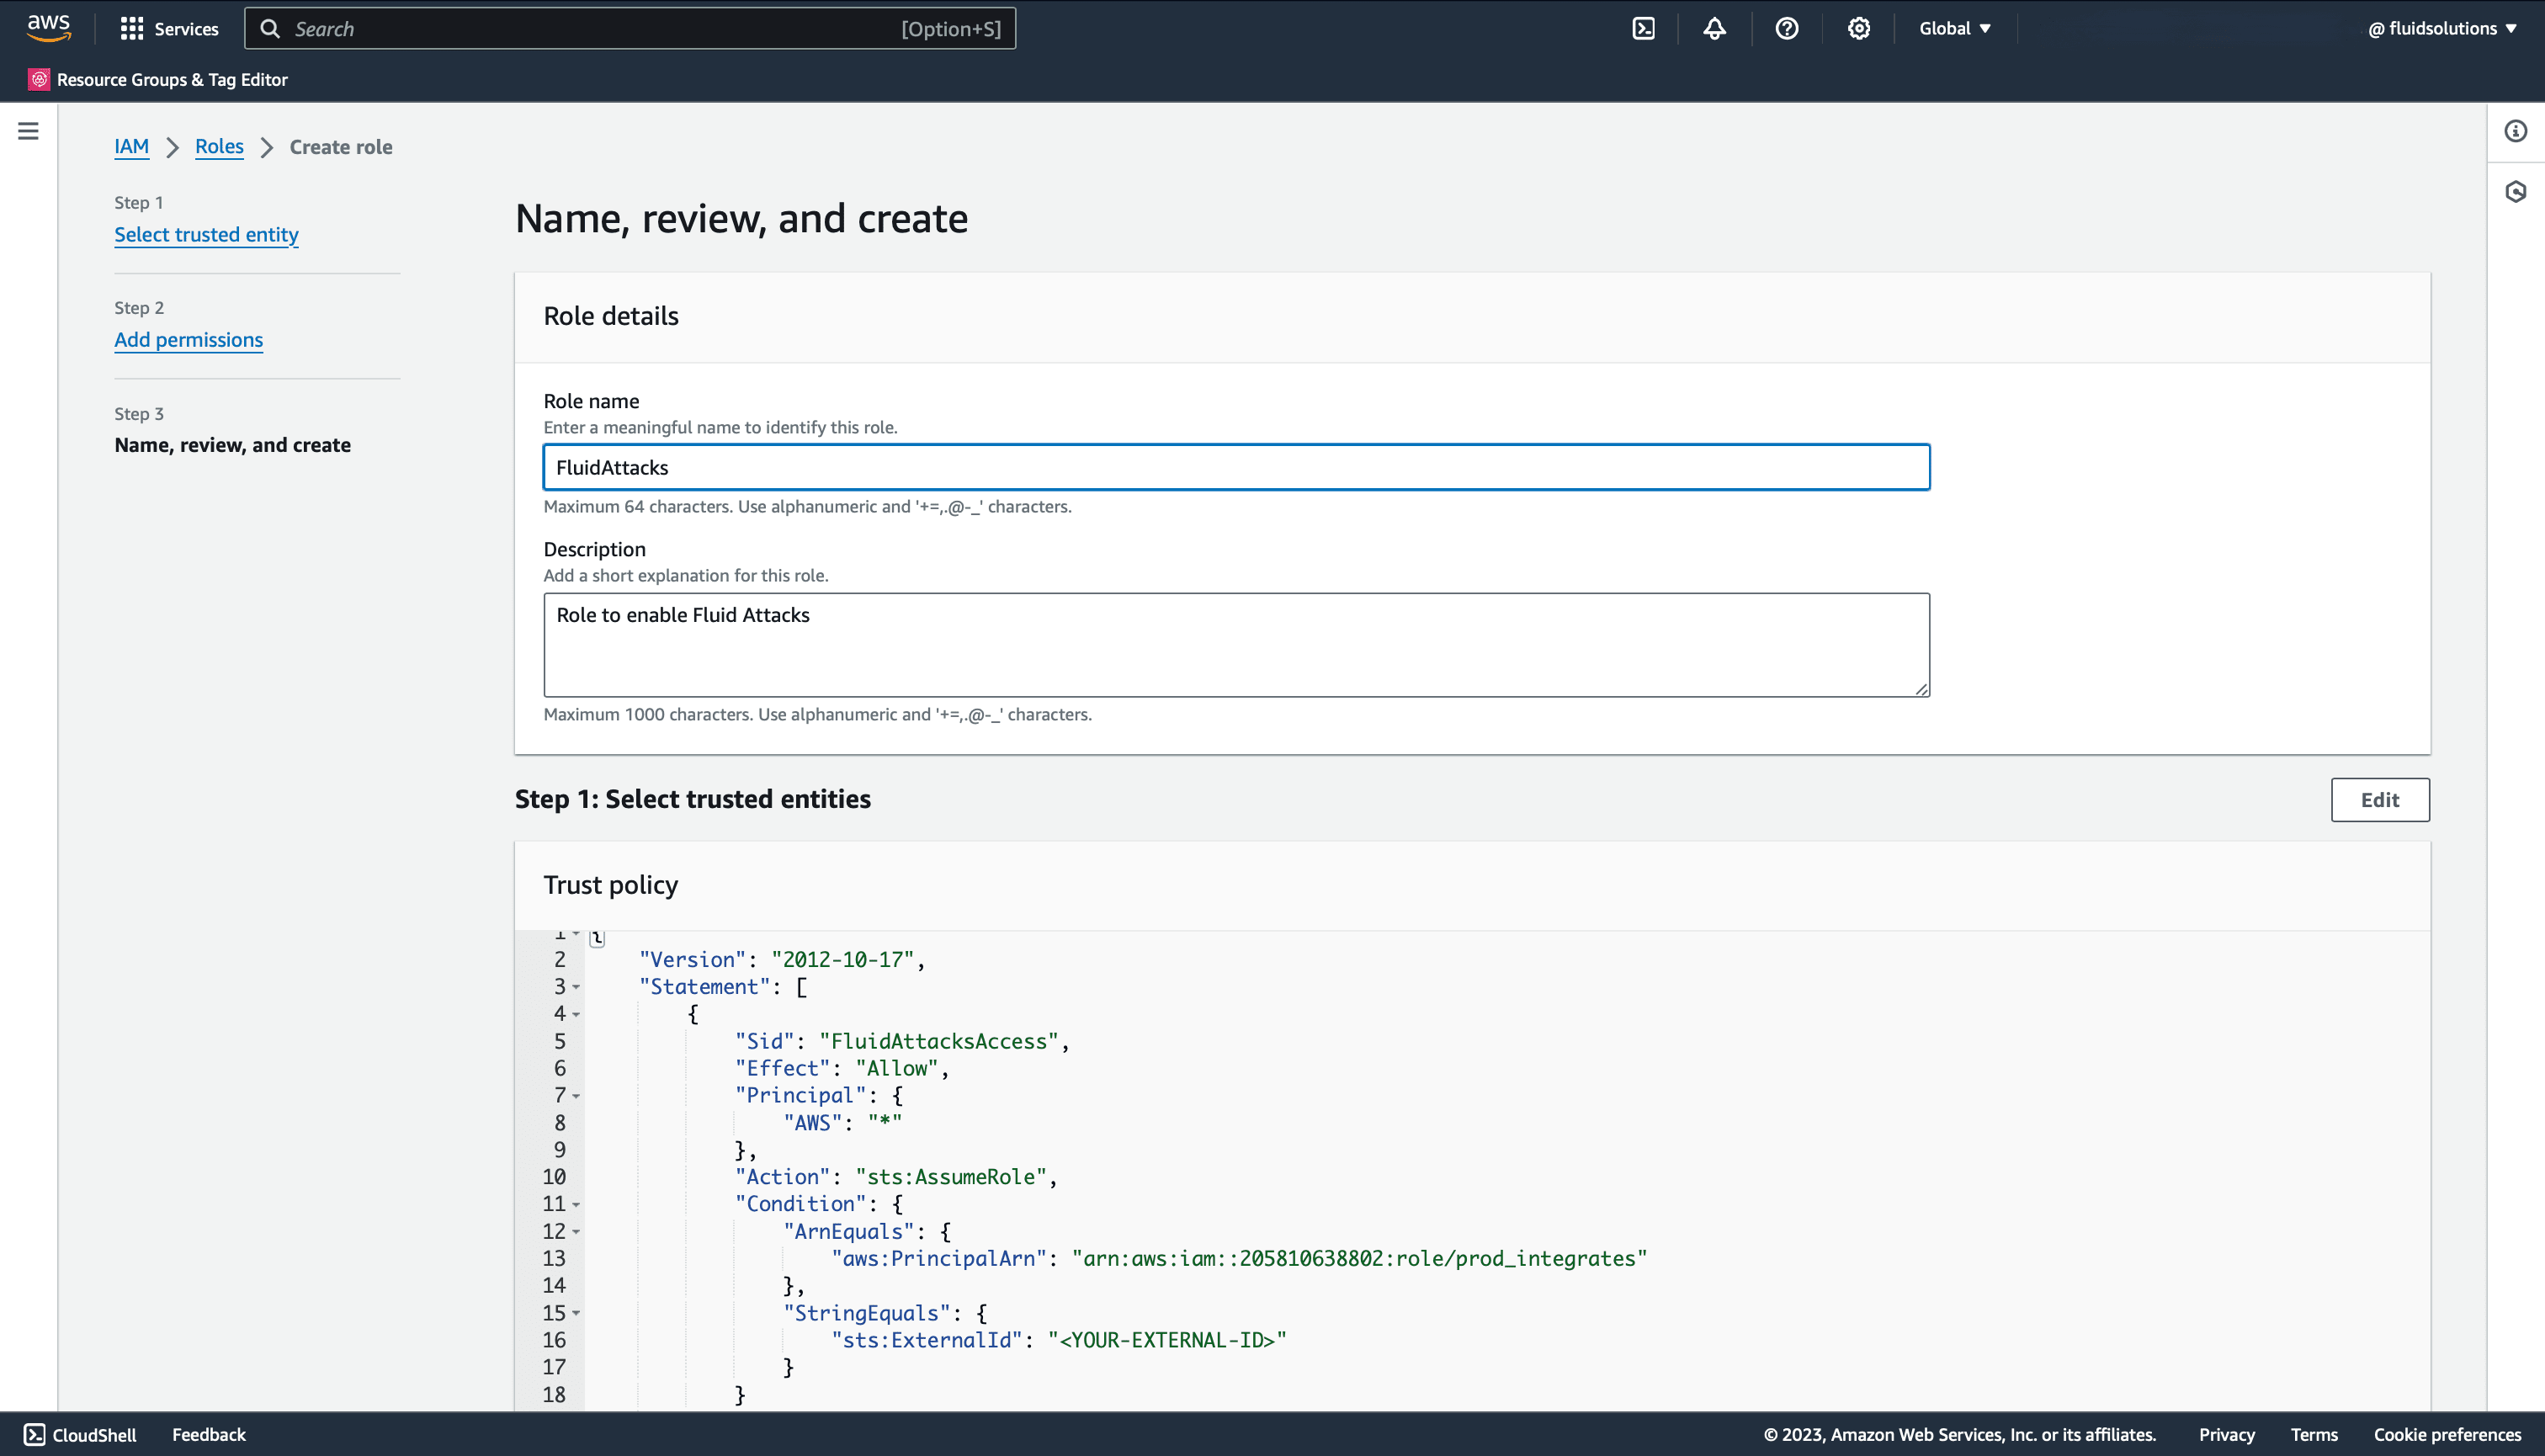
Type a name for the role, for example "FluidAttacksCodeCommit". Add a description.
-
Click Create role.
-
Find your new role in the IAM roles list. Click it to see its details.
-
Copy the ARN (Amazon Resource Name) at the top of the role summary. This value is necessary to complete the configuration in the Fluid Attacks platform.

Use AWS CloudFormation templates
You can automate the role creation with AWS CloudFormation. This method fits infrastructure-as-code workflows and multi-account deployments.
First, make the template. Then deploy it with one of these options:
Make the CloudFormation template
-
Make a new file with the .yaml extension.
-
Copy this CloudFormation template into the file:
Resources: CodeCommitAccessRole: Type: AWS::IAM::Role Properties: AssumeRolePolicyDocument: Version: "2012-10-17" Statement: - Effect: Allow Action: - "sts:AssumeRole" Principal: AWS: - "*" Condition: ArnEquals: aws:PrincipalArn: "arn:aws:iam::205810638802:role/prod_integrates" StringEquals: sts:ExternalId: "<YOUR-EXTERNAL-ID>" Description: Role to grant Fluid Attacks access to CodeCommit repositories ManagedPolicyArns: - arn:aws:iam::aws:policy/AWSCodeCommitReadOnly RoleName: FluidAttacksCodeCommit -
Replace
<YOUR-EXTERNAL-ID>with the external ID that Fluid Attacks made for your organization. -
Save the file.
This template uses the AWSCodeCommitReadOnly managed policy for simplicity.
Deploy with the AWS CLI
-
If you do not have the AWS CLI, install it.
-
Configure your security credentials (
AWS_ACCESS_KEY_IDandAWS_SECRET_ACCESS_KEY). Use a user with permissions to make CloudFormation stacks and IAM resources. -
Run this command to deploy the stack:
aws cloudformation deploy --template-file <path/to/template.yaml> \
  --stack-name <stack-name> \
  --capabilities CAPABILITY_NAMED_IAM
Replace <path/to/template.yaml> with the path to your template file.
Replace <stack-name> with a descriptive name,
for example fluid-attacks-codecommit.
-
After the deployment completes, get the role ARN with this command:
aws iam get-role --role-name "FluidAttacksCodeCommit"The command returns a JSON response with the role details, with the ARN.
Deploy with the AWS Management Console
-
Sign in to the AWS Management Console. Use an account with read and write permissions for CloudFormation and IAM resources.
-
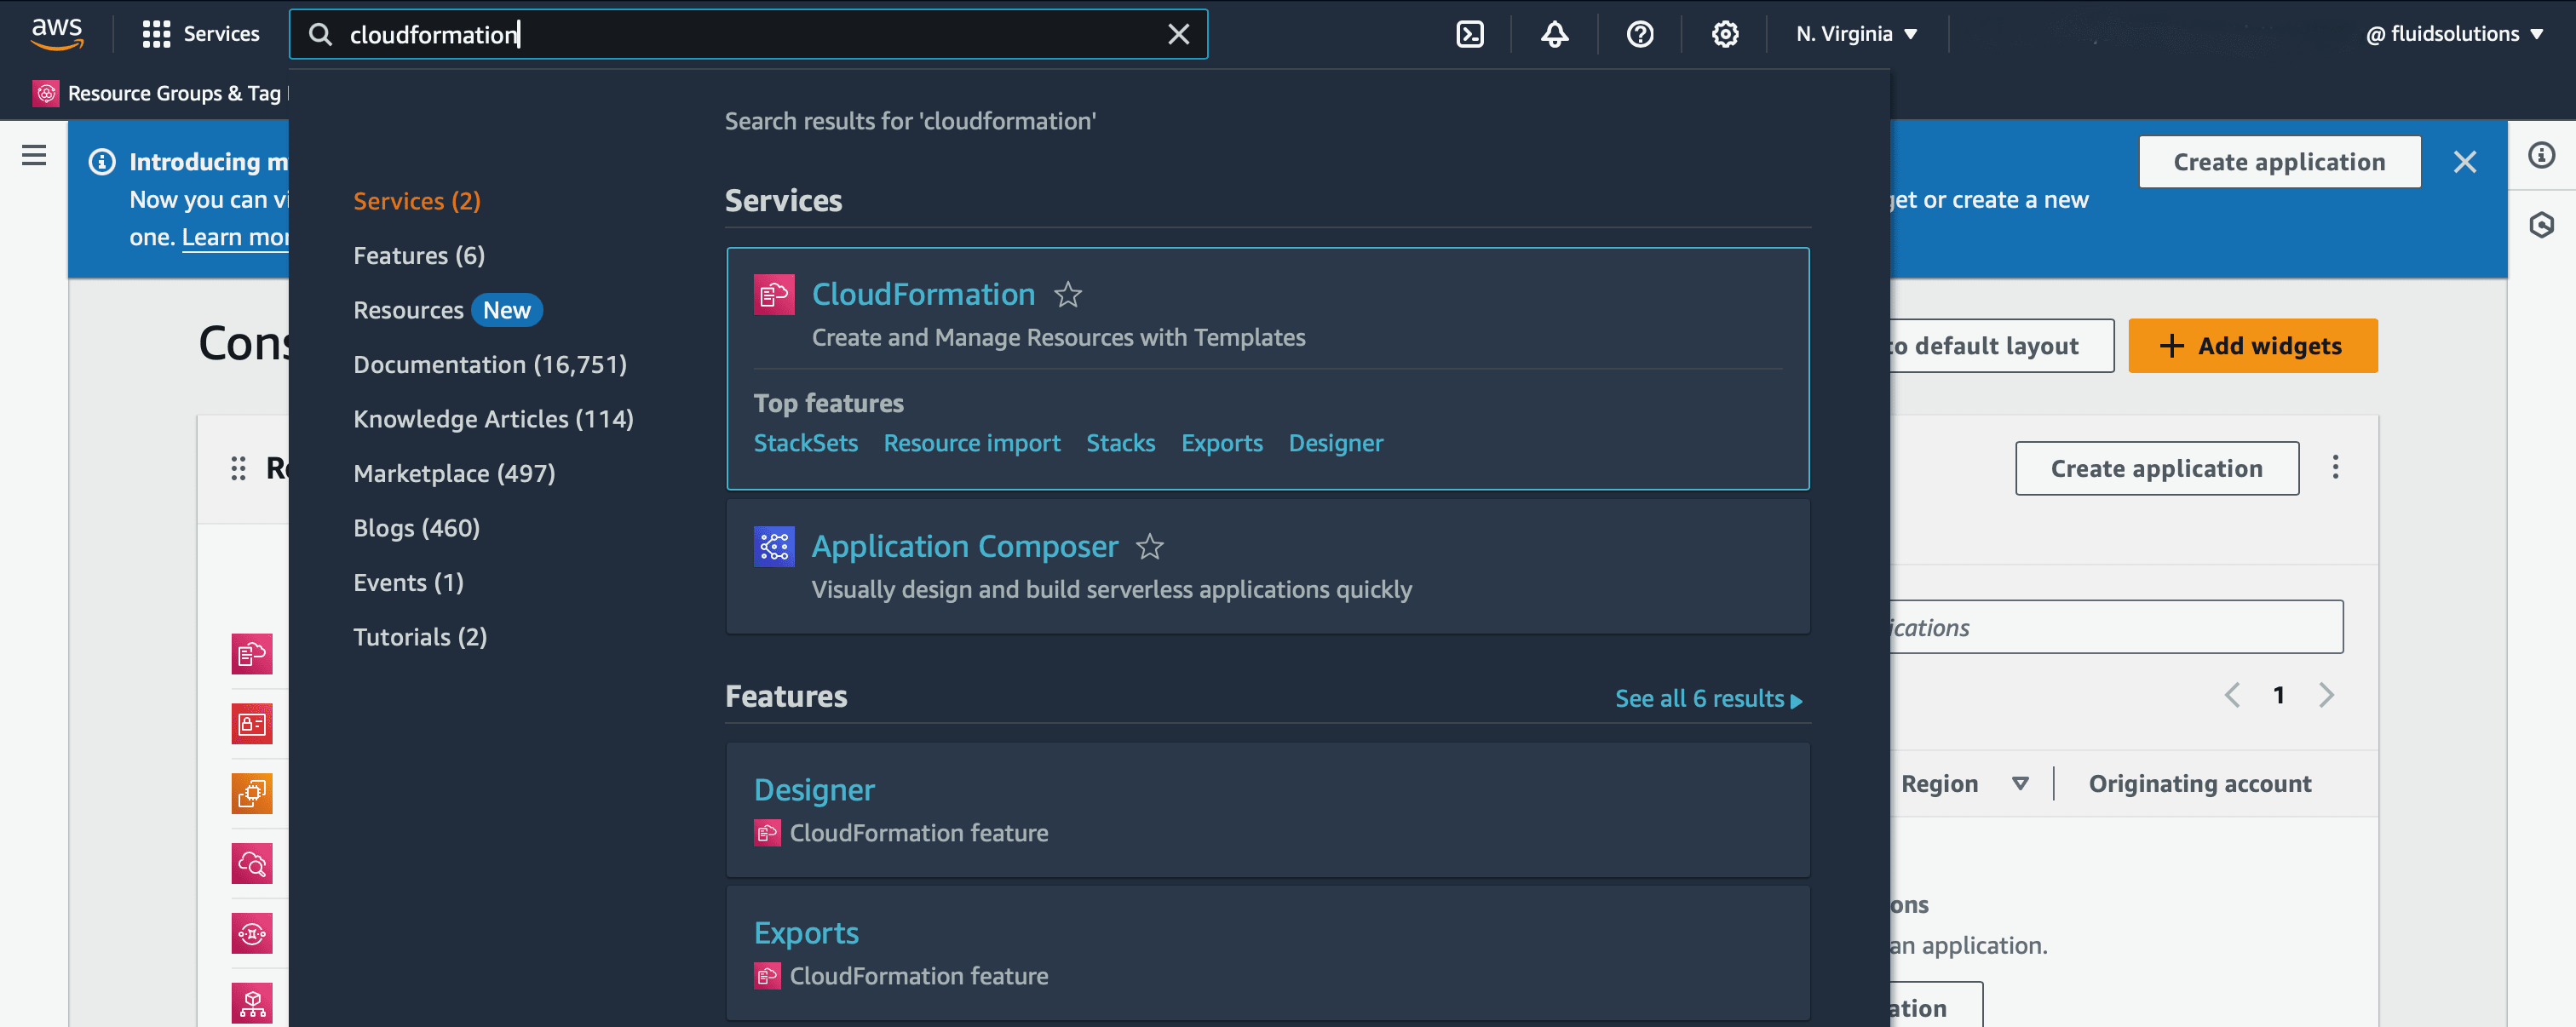
In the search bar, find the CloudFormation service. Open it.
-
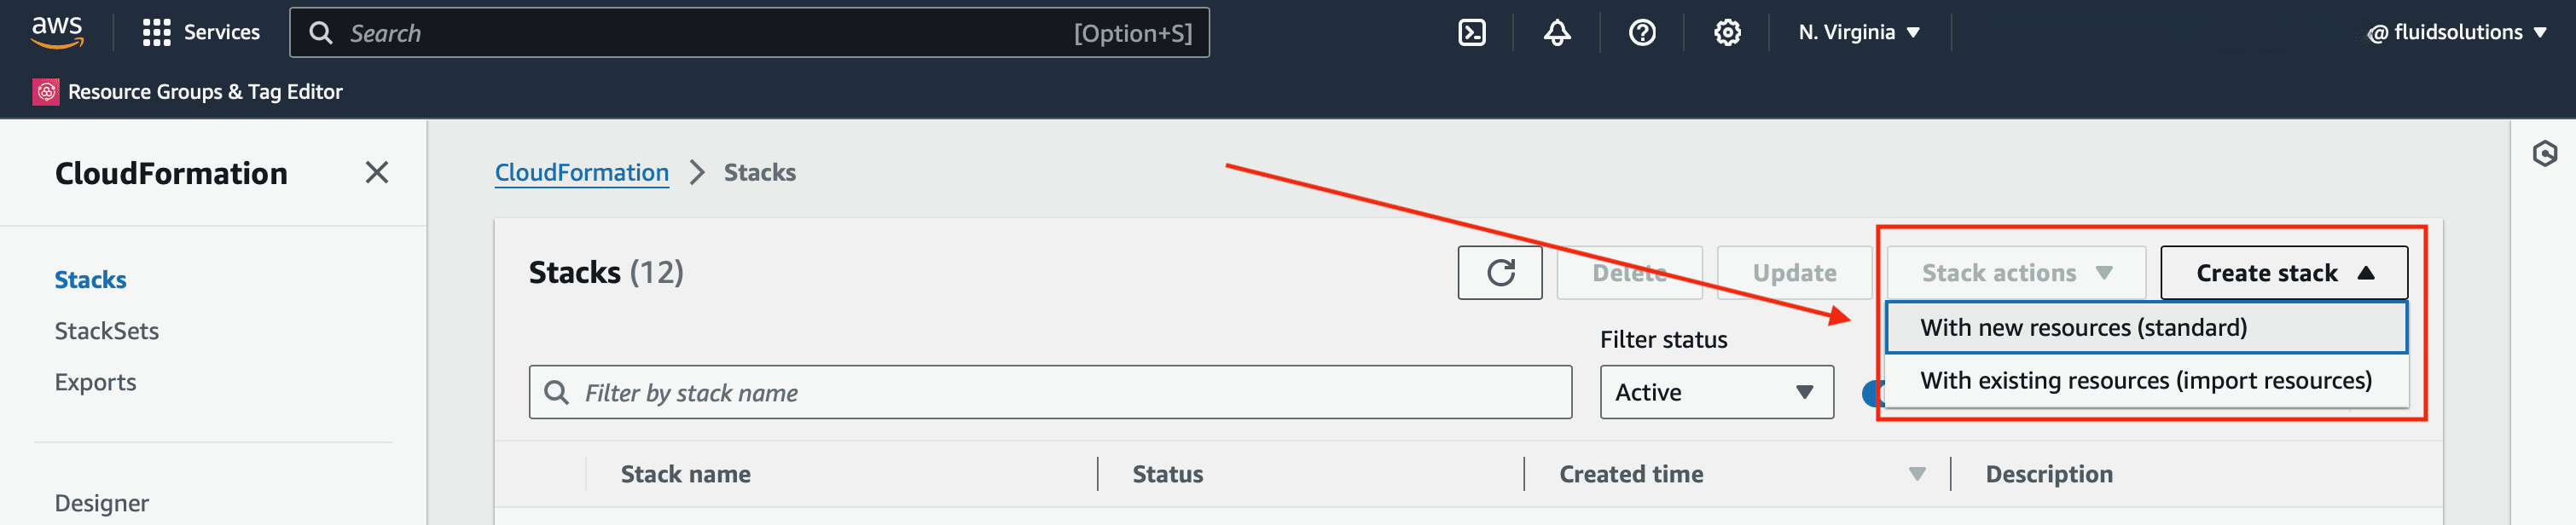
In the CloudFormation Dashboard, click the Create stack dropdown. Select With new resources (standard).
-
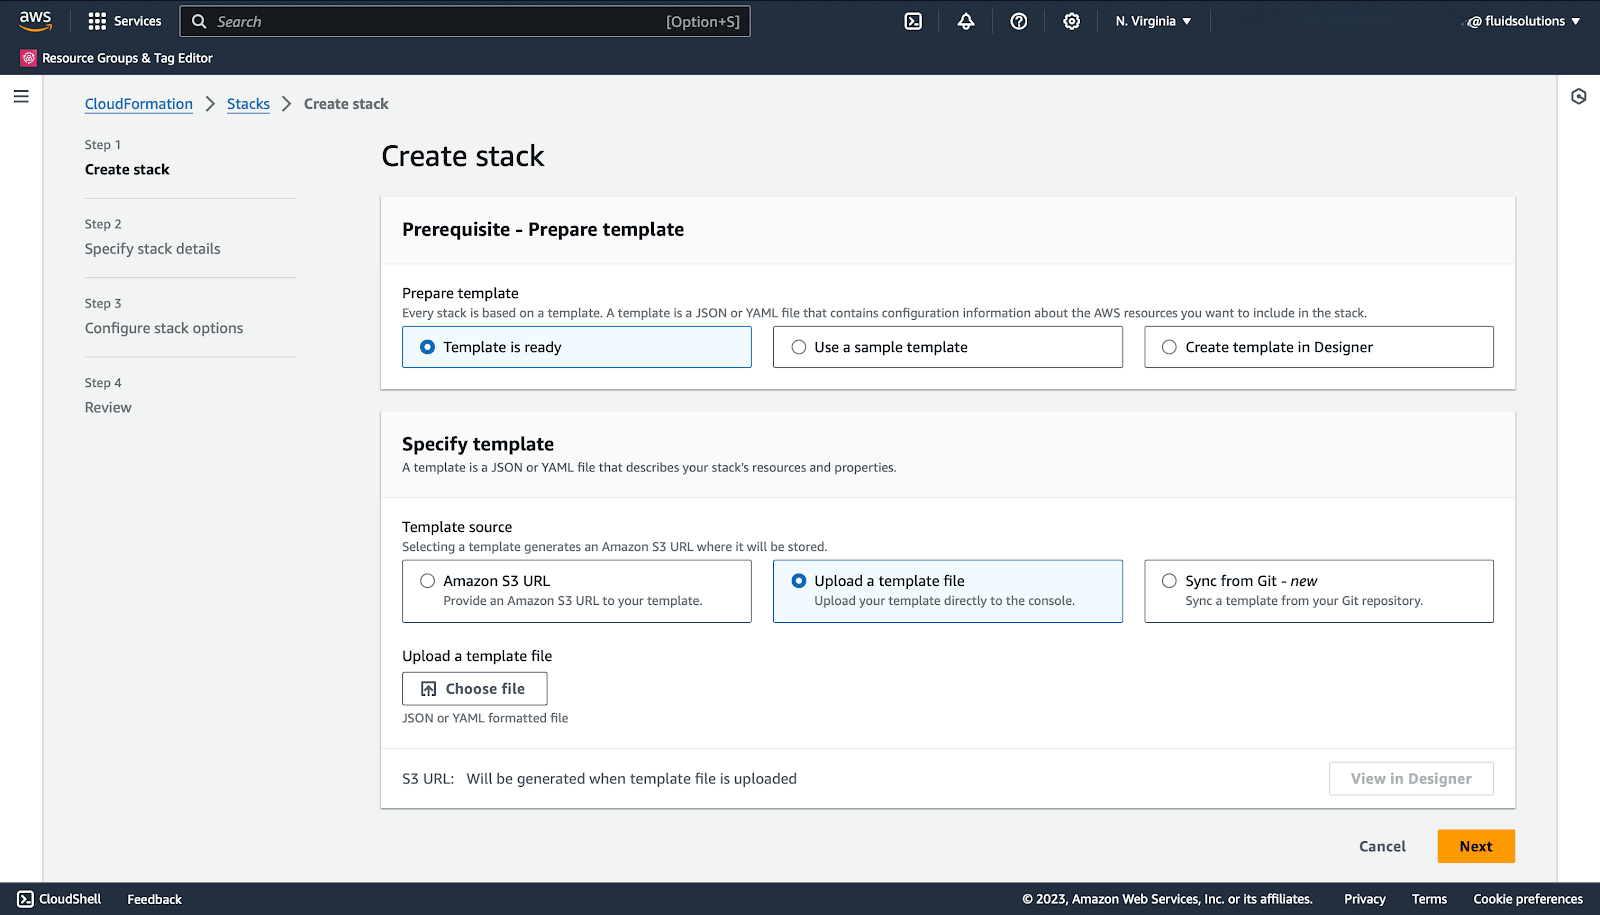
In Prerequisite - Prepare template, select Template is ready. In Specify template, select Upload a template file. Click Choose file. Select the template that you made.
-
Click Next.
-
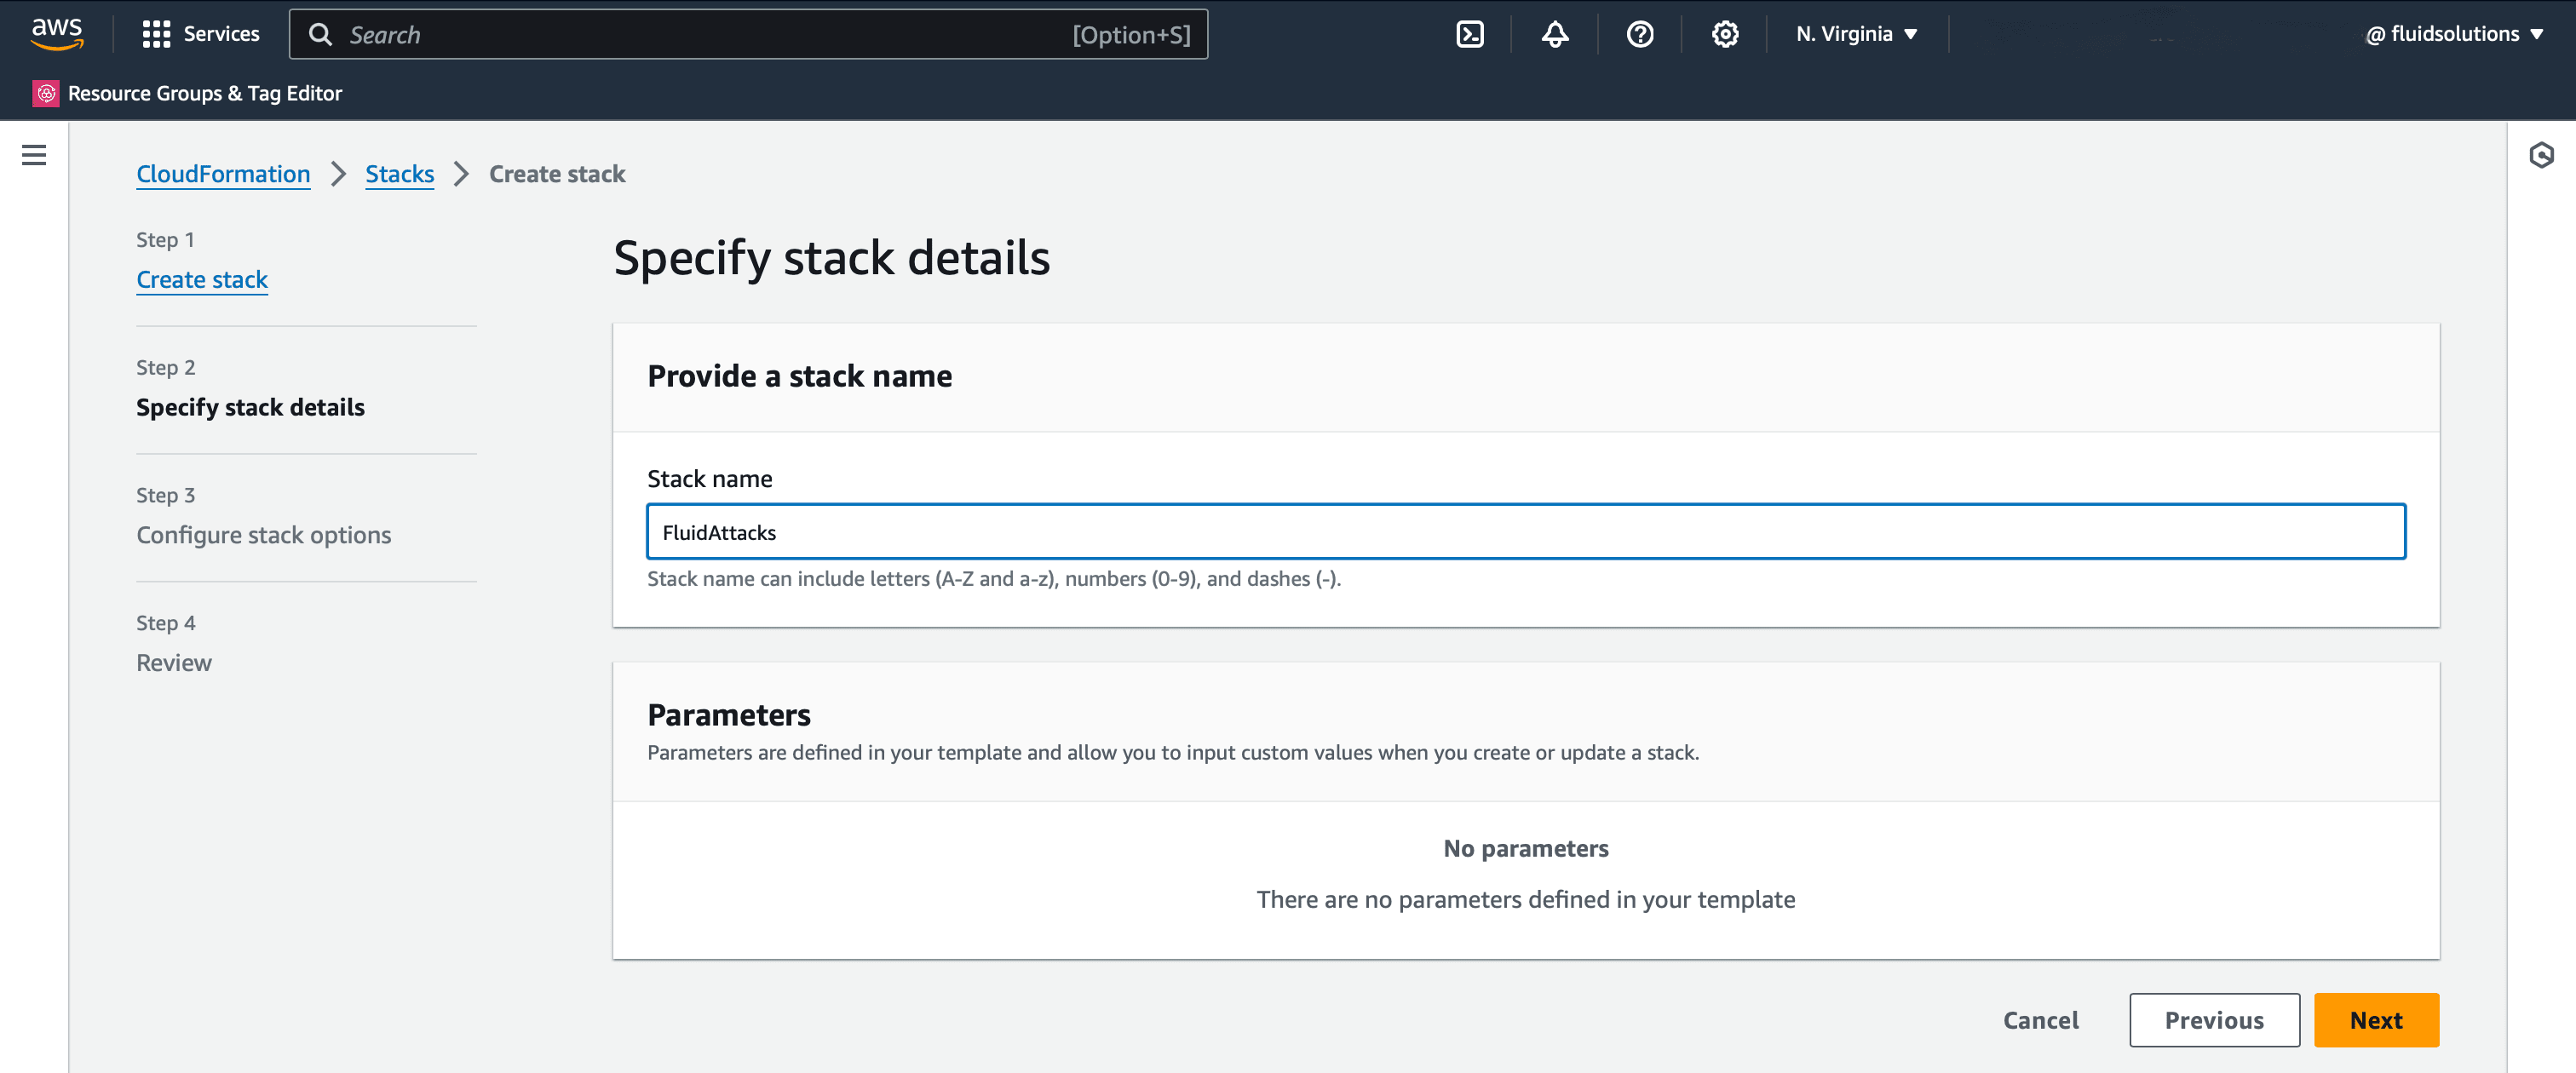
Type a name for the stack. Click Next.
-
On the Configure stack options page, keep the default settings. Click Next.
-
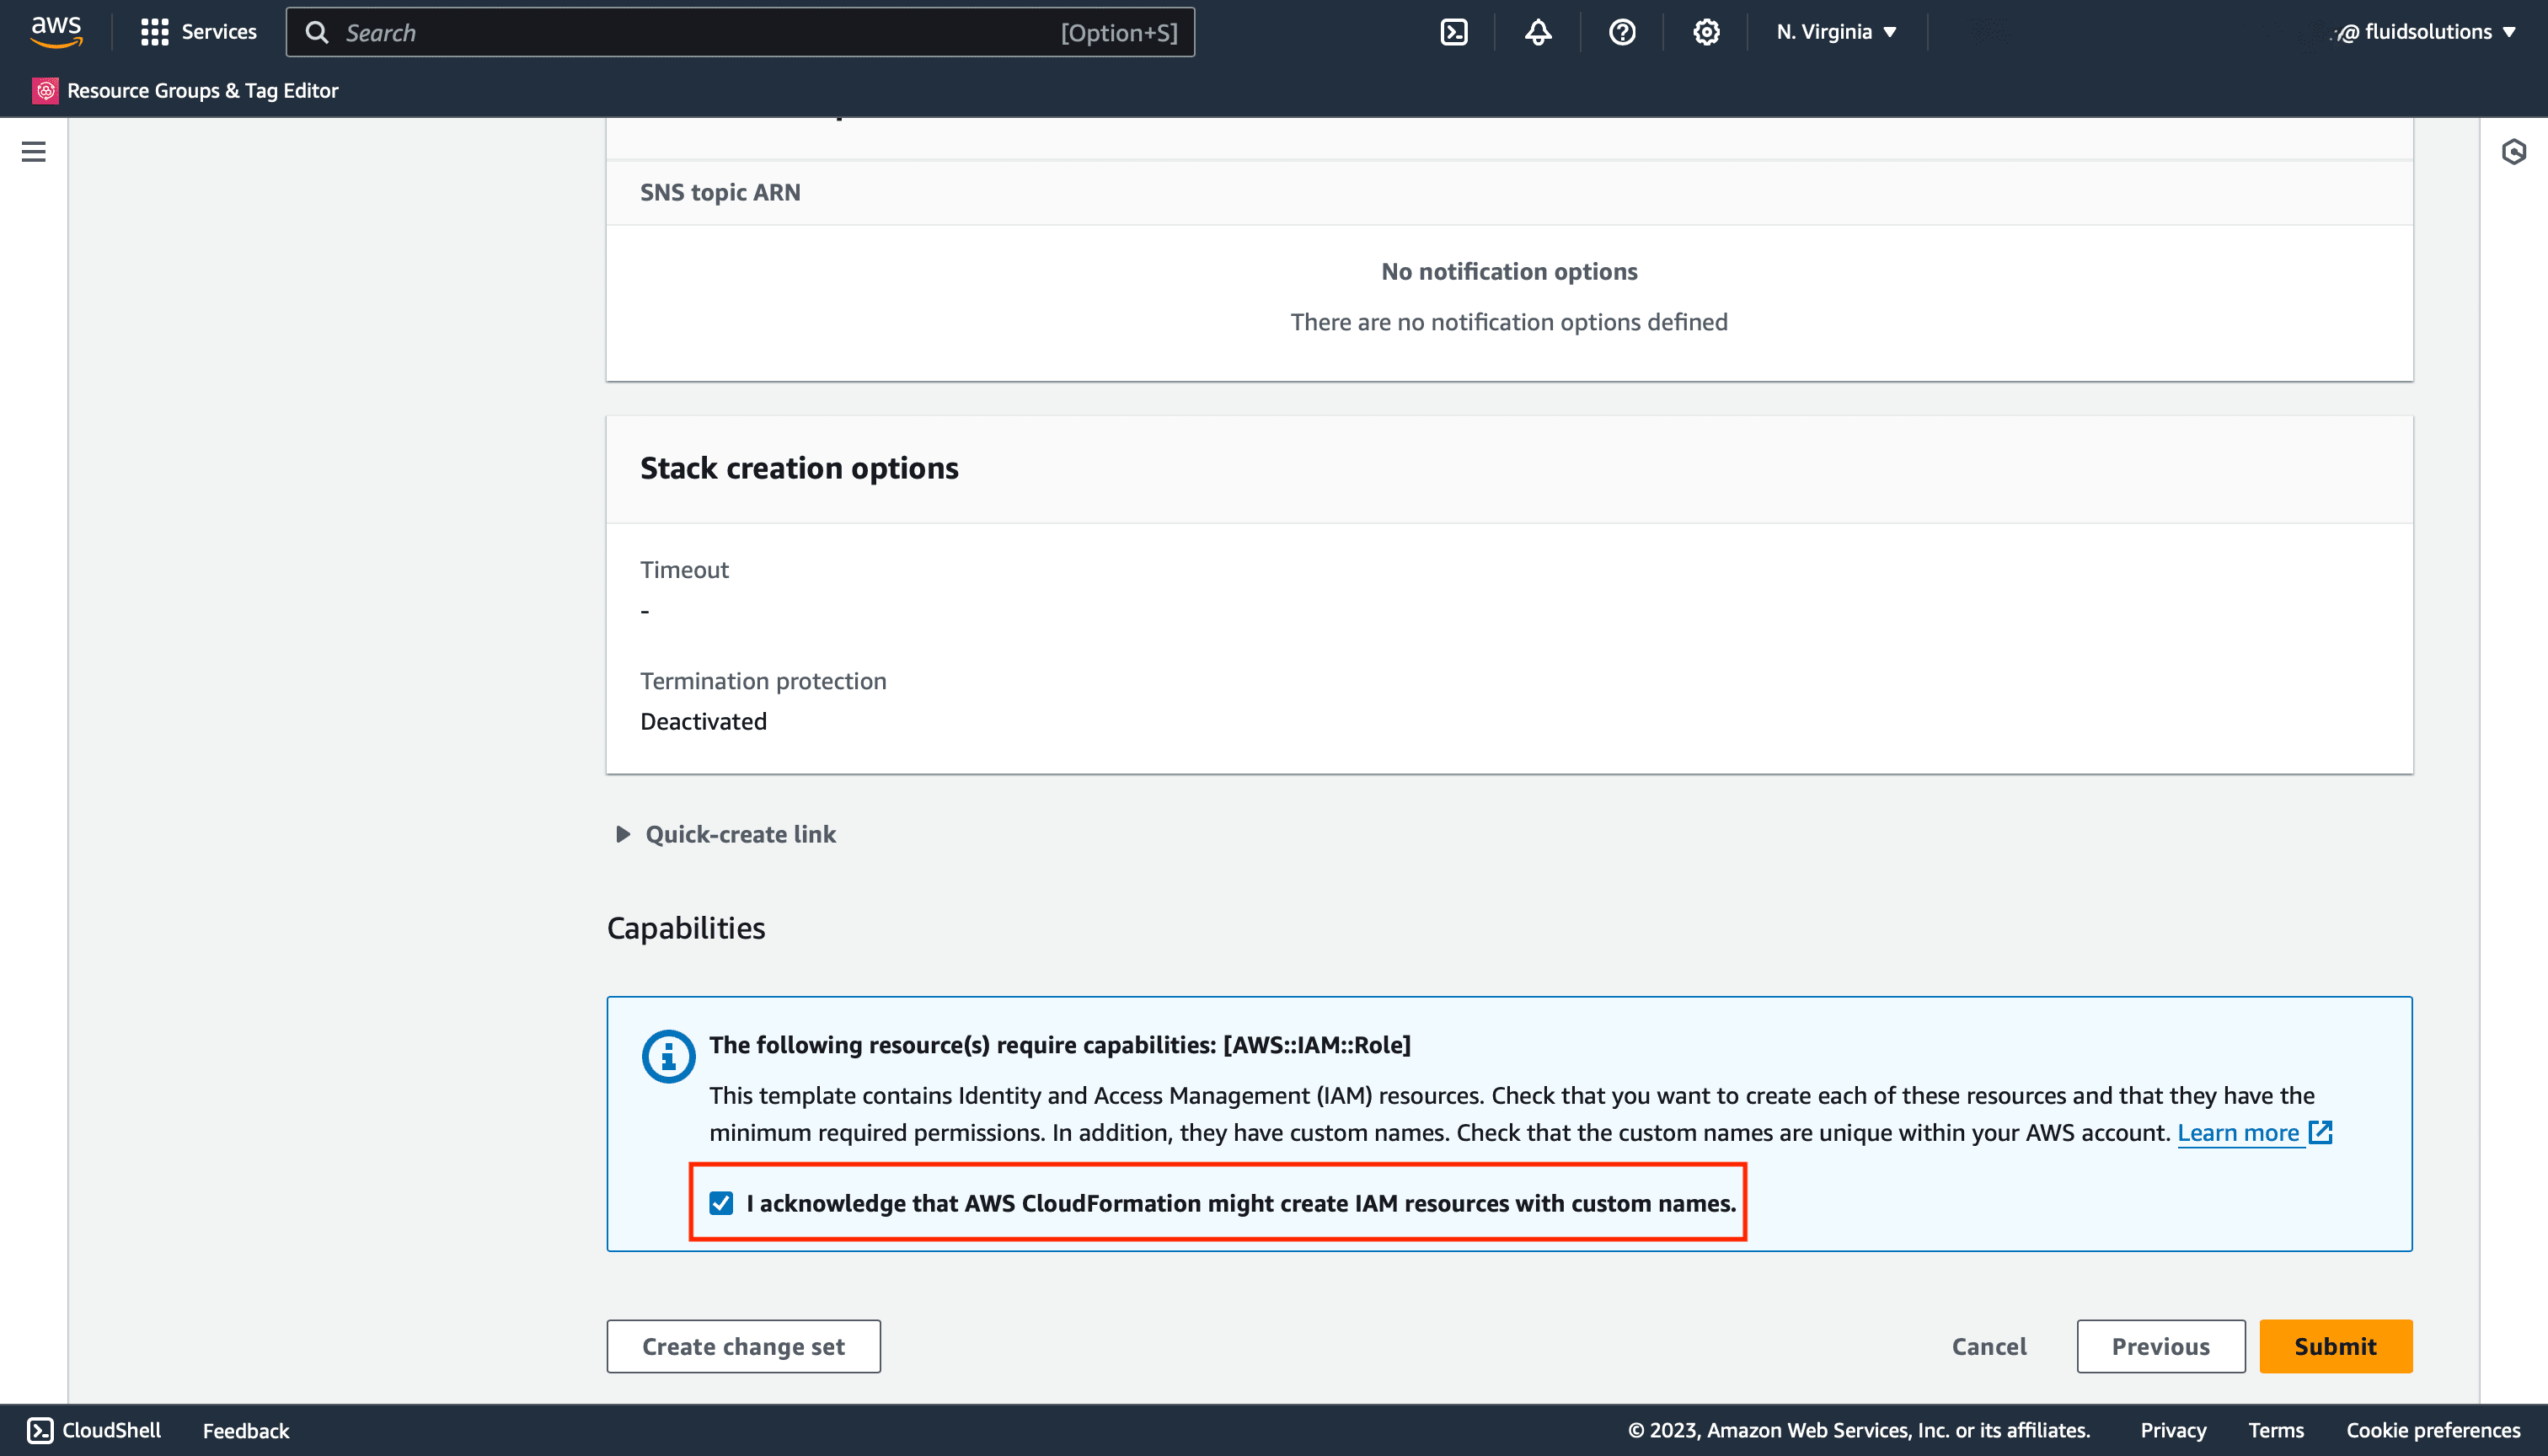
On the review page, scroll to the Capabilities section at the bottom. Check the box to acknowledge that CloudFormation can make IAM resources with custom names.
-
Click Submit to start the deployment. Wait until the stack status shows "CREATE_COMPLETE".
-
Go to the Resources tab. Click the Physical ID link of the role resource. This opens the IAM Dashboard.
-
Copy the ARN from the role summary. Use it in the Fluid Attacks platform.
Troubleshooting
If you have problems when you add your AWS environment to the Fluid Attacks platform, check these items:
- Role permissions:
Make sure that the role has the AWSCodeCommitReadOnly managed policy.
Or make sure that your custom policy includes
the
codecommit:Get*andcodecommit:GitPullactions for the target repositories. - External ID: Make sure that the external ID in the trust policy of your role matches the external ID that Fluid Attacks assigned to your organization. If the two IDs are not the same, the role assumption fails.
- Custom KMS keys:
Repositories with encryption from a custom Customer Managed Key (CMK) in AWS KMS
can fail to clone with authentication errors (403).
Custom KMS keys must have explicit decrypt permissions
for the CodeCommit service
and for each user that clones the repository.
Solutions:
- Change to AWS Managed Keys: Change the encryption settings of your repository to the default AWS managed key (aws/codecommit). This key handles all the necessary permissions.
- If you keep a custom CMK:
Make sure that your KMS key policy gives decrypt permissions to CodeCommit,
and that the IAM users have
kms:Decrypton the key. See AWS KMS Key Policies.
Types of authentication
Learn about the authentication methods Fluid Attacks may use to securely access your repositories. Get links to the steps for using OAuth, SSH, and HTTPS.
Service-level agreement
The Fluid Attacks service-level agreement, SLA, guarantees platform availability and risk exposure discovery of at least 90 percent, and fast response times.